7. bioimage-deposition

7.1. Overview
In addition to making sure that data and metadata are well-structured, the FAIR data principles also involve sharing research outputs in ways that go beyond paper publications. However, even the best and most thorough deposition ecosystem would be worthless if no data were deposited. Therefore, this datatype-specific recipe for bio-imaging data provides:
information on available data and metadata standards and repositories.
a step-by-step recipe on data deposition in the BioImage Archive
If you generate bio-imaging data and want to make your data FAIR by openly depositing it in the BioImage Archive, this recipe is for you.
Note
This recipe is one of two recipe dealing with image data deposition in the BioImage Archive. The one you are reading now deals with data submission based on regular epifluorescence and confocal microscopy data and focuses on data organisation of datasets containing more than one imaging technique. It also provides step-by-step instructions on how to submit data to the BioImage Archive and how to navigate the Archive’s data submission web interface.
The other recipe focuses on high content screening data for compound libraries and provides more background on available data and metadata standards and repositories, as well as details on how to structure such data and upload mechanisms for larger datasets.
7.3. Chosing repositories for bioimaging data
Over the last decade, the field of bioimaging has sought to develop a robust and effective bioimaging data ecosystem by creating bioimaging repositories and working towards their widespread adoption. There are a number of resources available to learn more about the existing repositories in each domain and their respective scopes. Here is a short overview of some repositories for bioimaging data:
A central, primary archive for bioimaging data is available through the BioImage Archive (Hartley et al. 2022), which hosts data from all imaging modalities associated to a peer-reviewed publication where no more specialised resource exists.
In contrast, the Image Data Resource (IDR) (Williams et al., 2017) is an added-value database for several microscopic imaging modalities with highly curated metadata, including high-content screening data. The objective is to link the imaging data with other databases, such as those for genetic and chemical information, as well as cell and tissue phenotypes.
The Electron Microscopy Public Image ARchive (EMPIAR) (Iudin et al. 2023) publicly archives 2D electron microscopy raw data underlying 3D cryo-EM protein structures and data from 3D volume EM experiments.
The Systems Science of Biological Dynamics Repository and Database (SSBD) (Tohsato et al., 2016) is a repository and database pair comprising a primary archive and added-value database for quantitative data of spatiotemporal dynamics of biological objects primarily obtained from microscopy. According to the FAIR principles, data should be shared as openly as possible, but as closed as necessary. This principle is especially important for sensitive and biomedical data that cannot be fully openly shared and deposited.
Thus, restricted-access and topic-specific repositories for bioimaging data include for example The Cancer Imaging Archive (Clark et al. 2013).
For more detailed information on repositories and FAIR practices in bioimaging data, we recommend consulting the RDMkit pages on bioimage data or the repository overview from Euro-BioImaging.
7.4. The example dataset
This recipe will detail the data preparation and deposition process on the following real-life example:
Beucher, Guillaume et al. “Bronchial epithelia from adults and children: SARS-CoV-2 spread via syncytia formation and type III interferon infectivity restriction.” Proceedings of the National Academy of Sciences of the United States of America vol. 119,28 (2022): e2202370119. doi:10.1073/pnas.2202370119
To study the spread of SARS-CoV-2 infection, the authors performed light and electron microscopy on bronchial epithelia that were reconstructed from infected adult and child donors. The data from the example dataset comprises light microscopy and some transmission electron microscopy published in a peer-reviewed publication and does not contain person-identifiable images. Therefore, the BioImage Archive is the optimal choice for the deposition of this dataset.
7.5. Step-by-step recipe for bioimage data deposition to BioImage Archive
7.5.1. Step 1: Familiarize with the BioImage Archive
The first step in any deposition is to get to know the repository, to assess whether the scope is really appropriate, and to get an overview of the requirements and the deposition process. For the BioImage Archive, this information is also summarised in their corresponding Quick-Tour.
Furthermore, it is important to gain insight into the general architecture of the repositories entries to understand what is possible for specific cases. Browse the archive to see some examples of current entries.
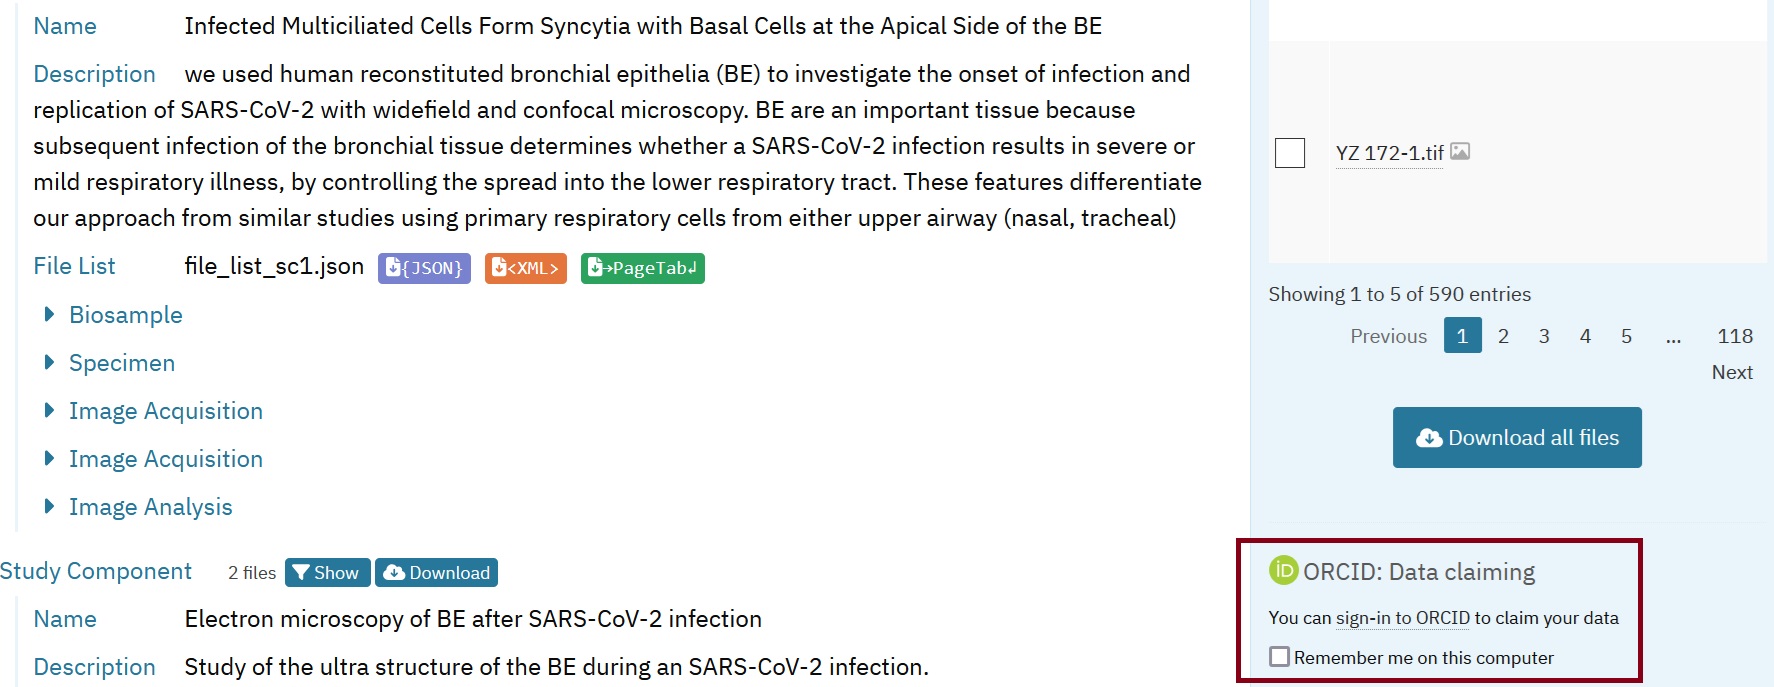
The completed entry from the example dataset, generated through the steps outlined in this recipe, is provided here for reference:
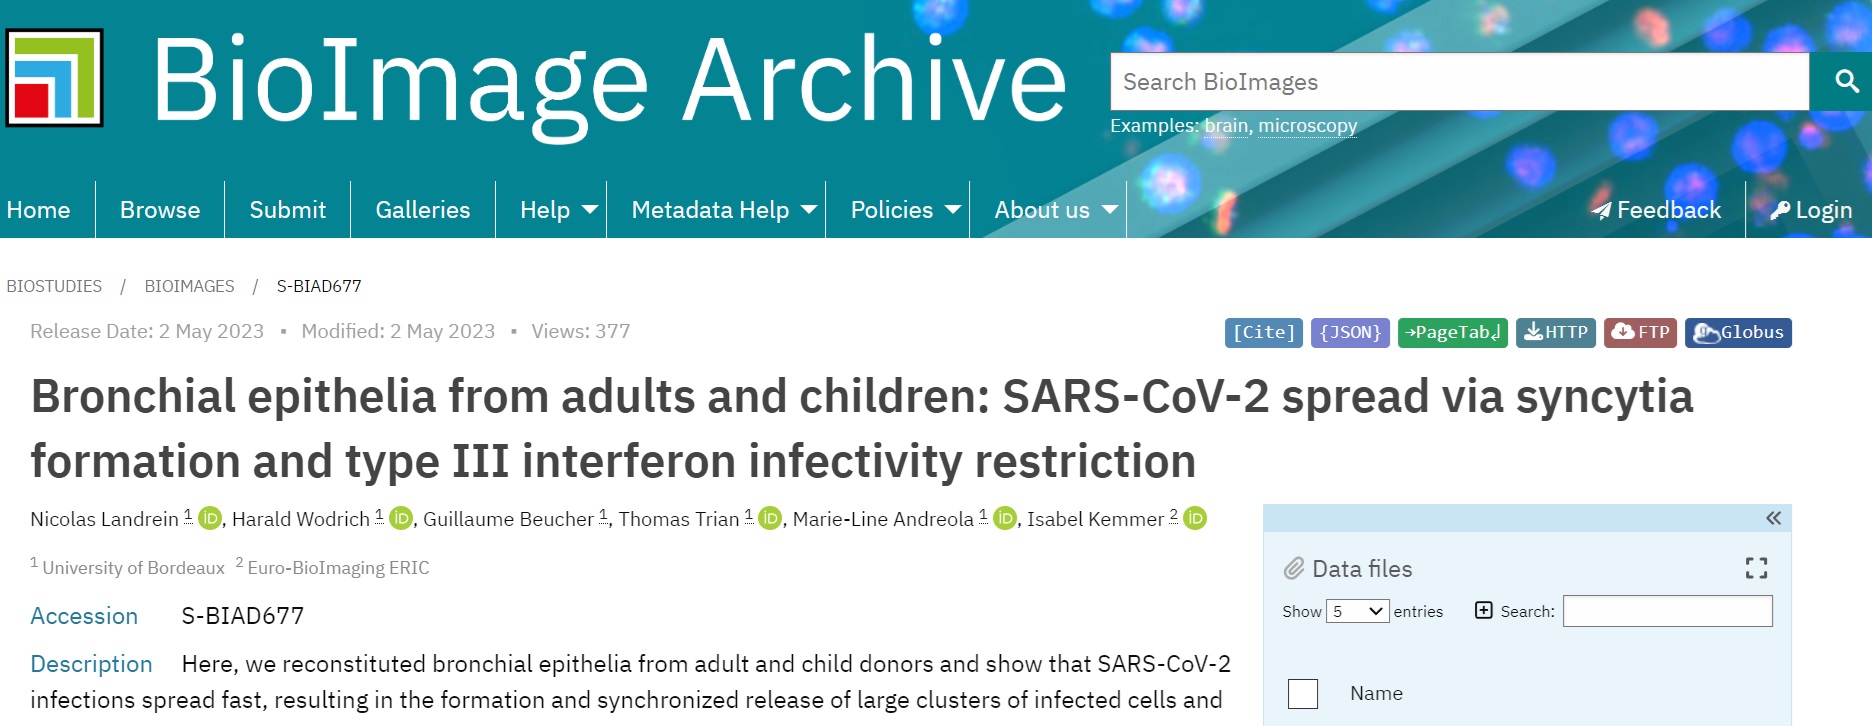
Fig. 7.8 Overview of the example entry in BioImage Archive
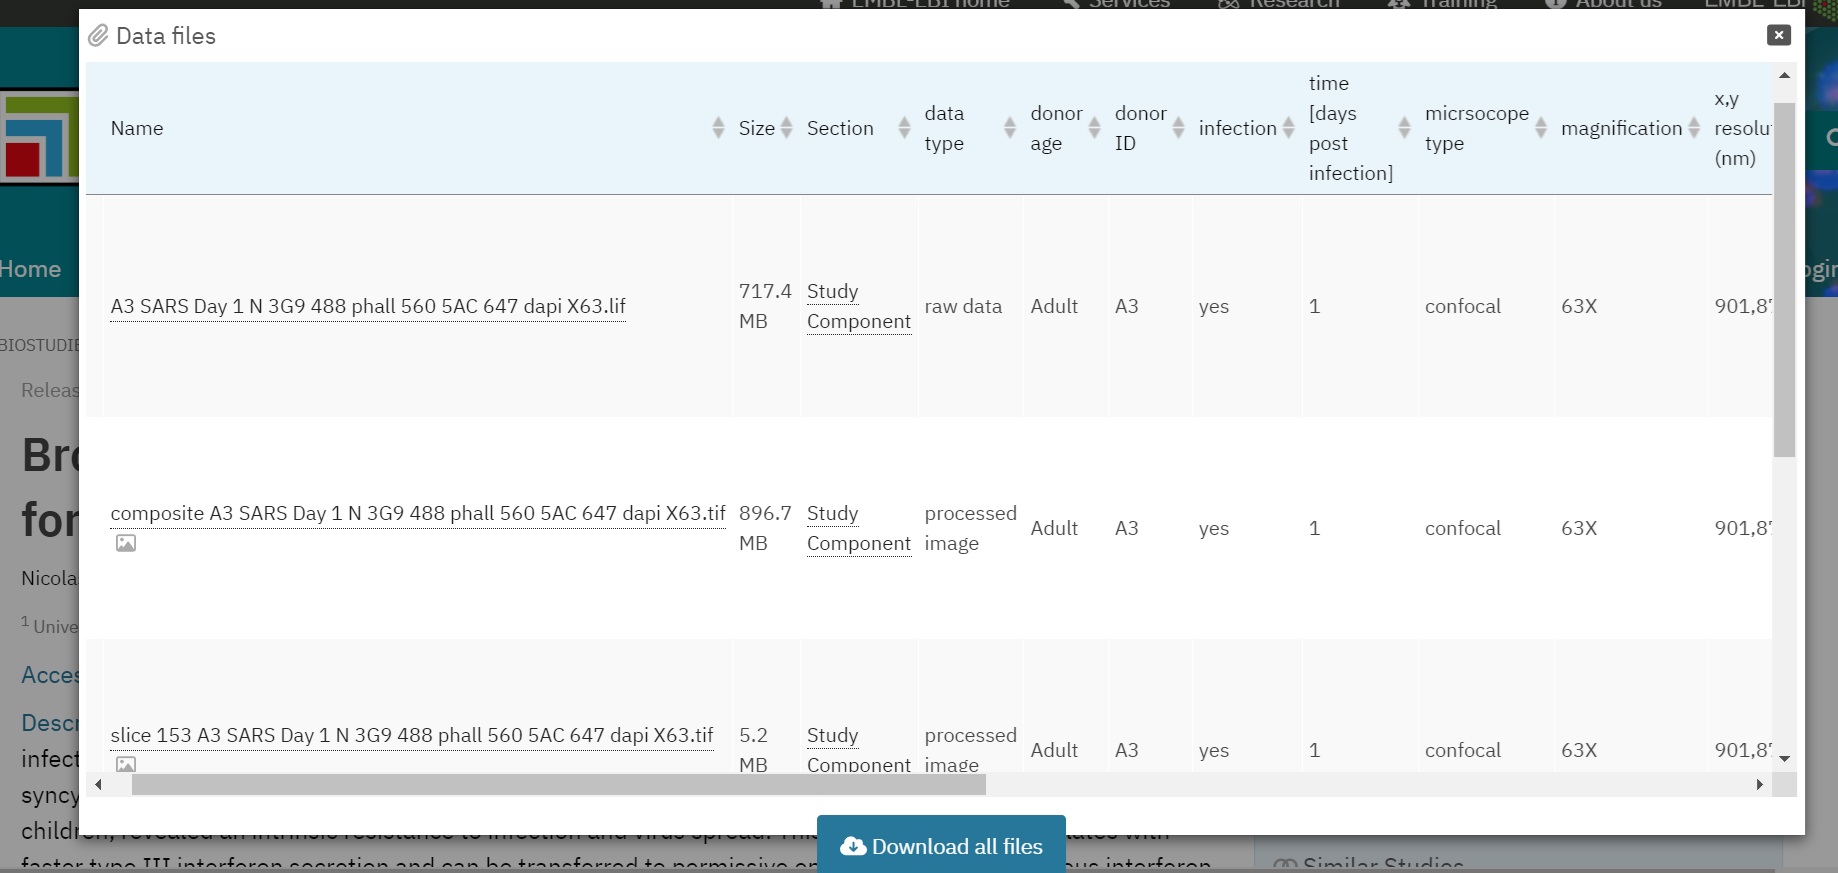
Fig. 7.9 Overview of a File-list in BioImage Archive
7.5.2. Creating an account
To deposit data in the BioImage Archive, a BioStudies Account is required as the BioImage Archive currently uses the BioStudies submission system. This account is free and only requires a valid email address. However, providing your ORCID will improve the findability of your submissions.
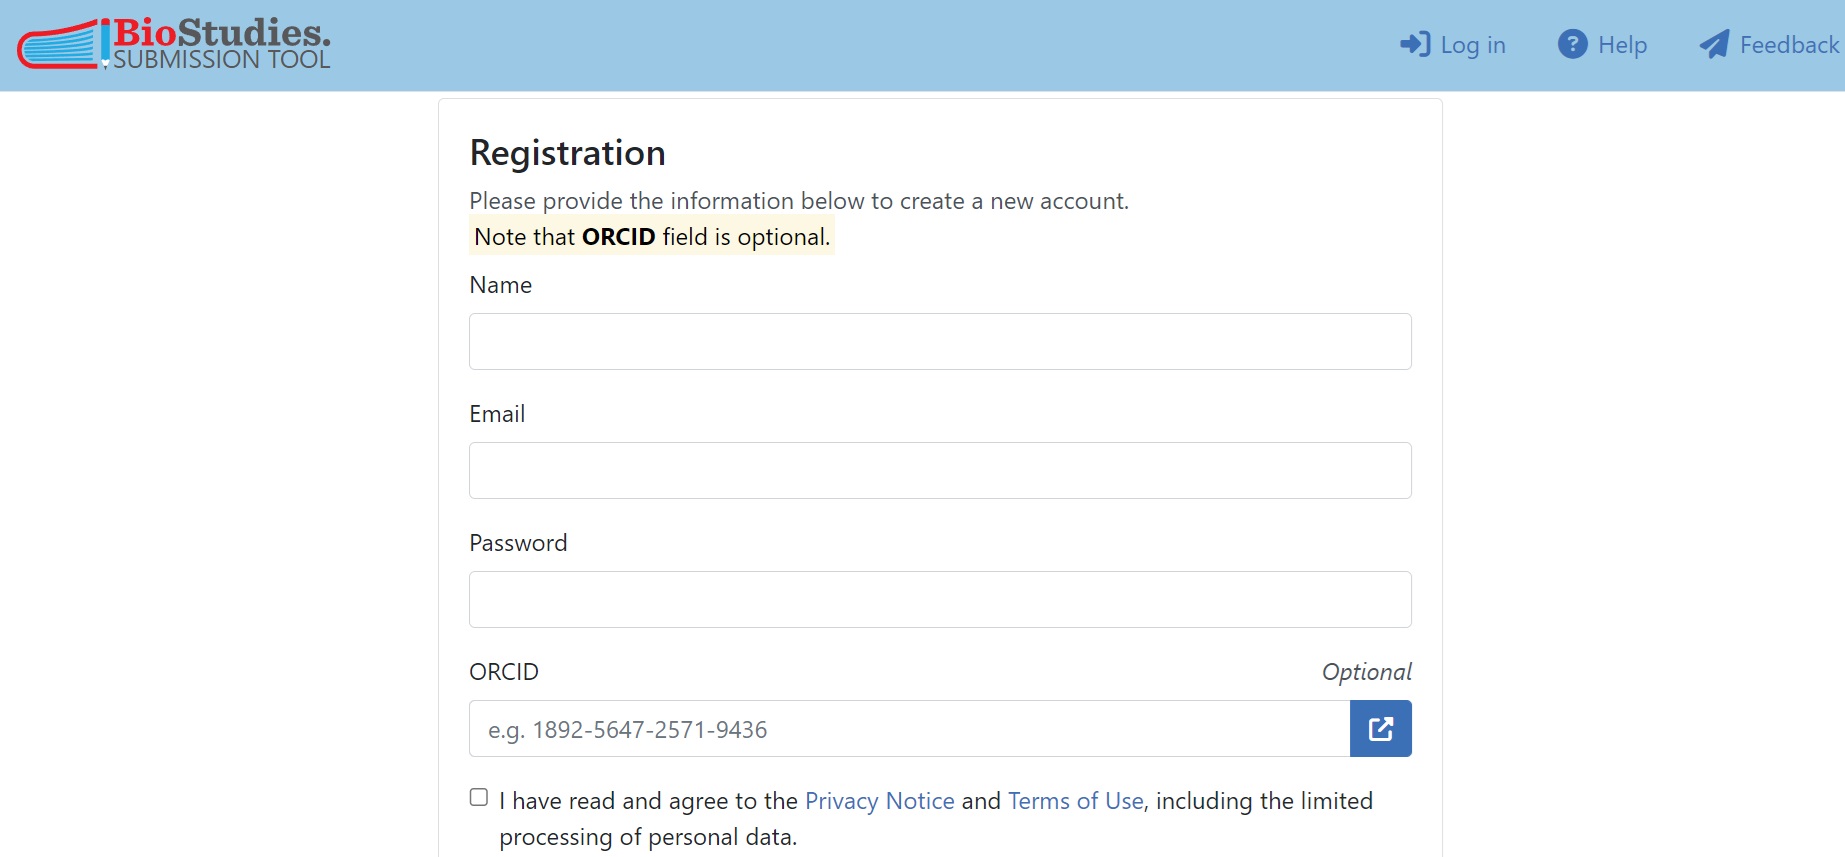
Fig. 7.10 Registration for BioStudies Account
7.5.3. Step 2: Familiarize with REMBI
Metadata is essential to making data FAIR, as it enables researchers to understand the data. To ensure basic metadata quality yet enable routine deposition, the BioImage Archive uses minimal metadata reporting according to the REMBI guidelines. The imaging community has come together to create a standard for describing biological images and their associated studies and specimens: Recommended Metadata for Biological Images (REMBI). It improves the sharing of image data and enables automated data harvesting. REMBI has a high-level 8-component structure which can be further specified and adapted to cover different biological imaging methods and subdomains. Take a look at which metadata information needs to be included for each of the REMBI components in the BioImage Archive 1 .
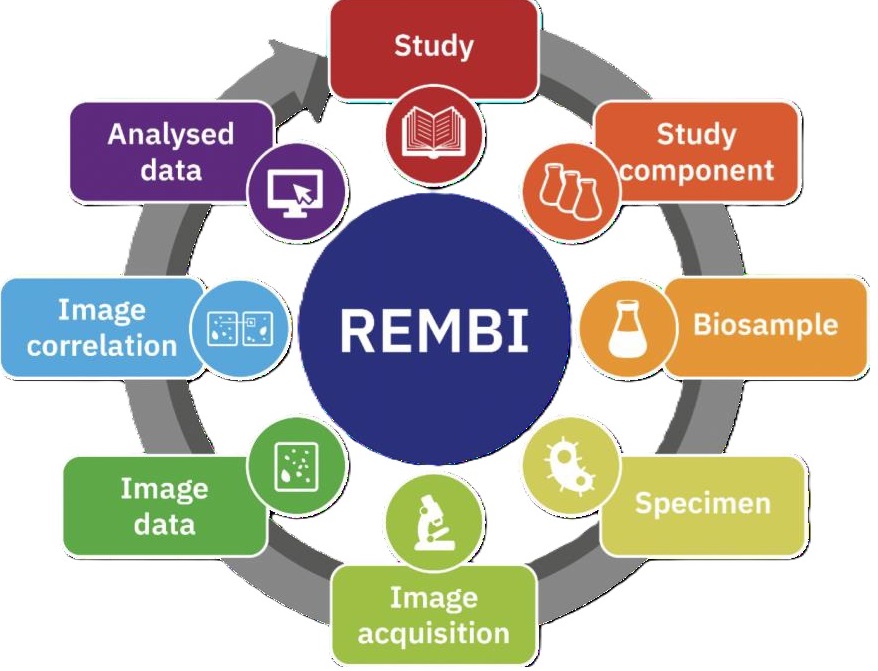
Fig. 7.11 Overview of REMBI components
7.5.4. Step 3: Organize the data
Before uploading, it is important to organise the data. This includes organising it into folders as well as thinking about organising the BioImage Archive entry into Study Components (see 3.2). The two do not necessarily have to overlap completely, but it is helpful nevertheless to also think about the Study Components beforehand which can guide the folder organisation.
7.5.4.1. Data organization in folders
Data files (images, raw and processed, and associated data files) to be included in the BioImage Archive entry should be organised in one or several folders, each with as many subfolders as necessary, following a logical and hierarchical file structure. The REMBI framework is useful for planning what to include and how to organise the data. It is recommended that the dataset is organised by grouping imaging modalities and/or experiments (i.e. Study Components) in one folder, although in some cases it may also be appropriate to organise the data according to the structure of the underlying paper.
Note
The file paths will not be visible on the submission page. For this reason, if the directory structure contains metadata, please include it in the File-list (Step 5).
7.5.4.2. Define the Study Components
As the BioImage Archive uses the REMBI scheme for metadata, the data organisation follows the REMBI scheme and is therefore structured in so-called Study Components. A submission may contain one or more Study Components and there is the possibility to mix and duplicate several REMBI category components in the same Study Component. In this way, the structure of the experimental layout can be freely designed and there are several ways and examples on how to do so for different types of studies.
In the simplest case, a study contains only one Study Component, because only one experimental unit was performed, and each REMBI component appears only once, because a single specimen was taken from a biosample and a single imaging protocol was performed.
The structure of the example study is a more complex as it contains two basic variables: the imaging technologies and the experimental sample. This is the overview scheme of the example dataset and a preview of its organisation in the finished entry.
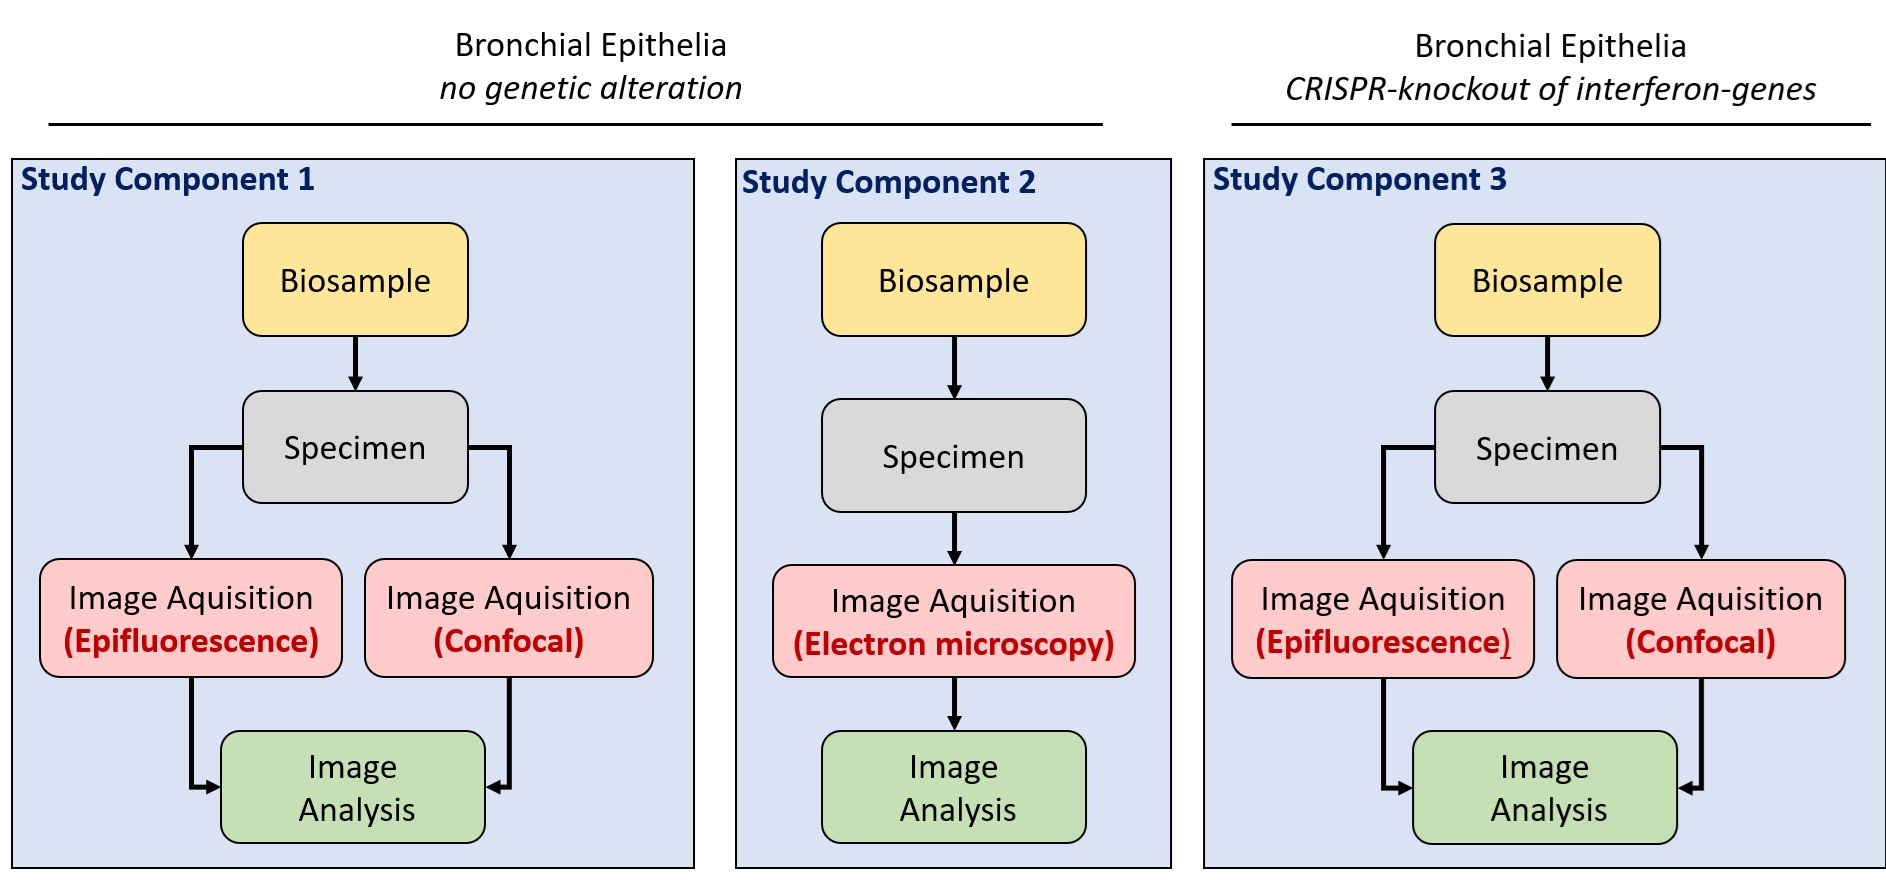
Fig. 7.12 Overview of study component logic
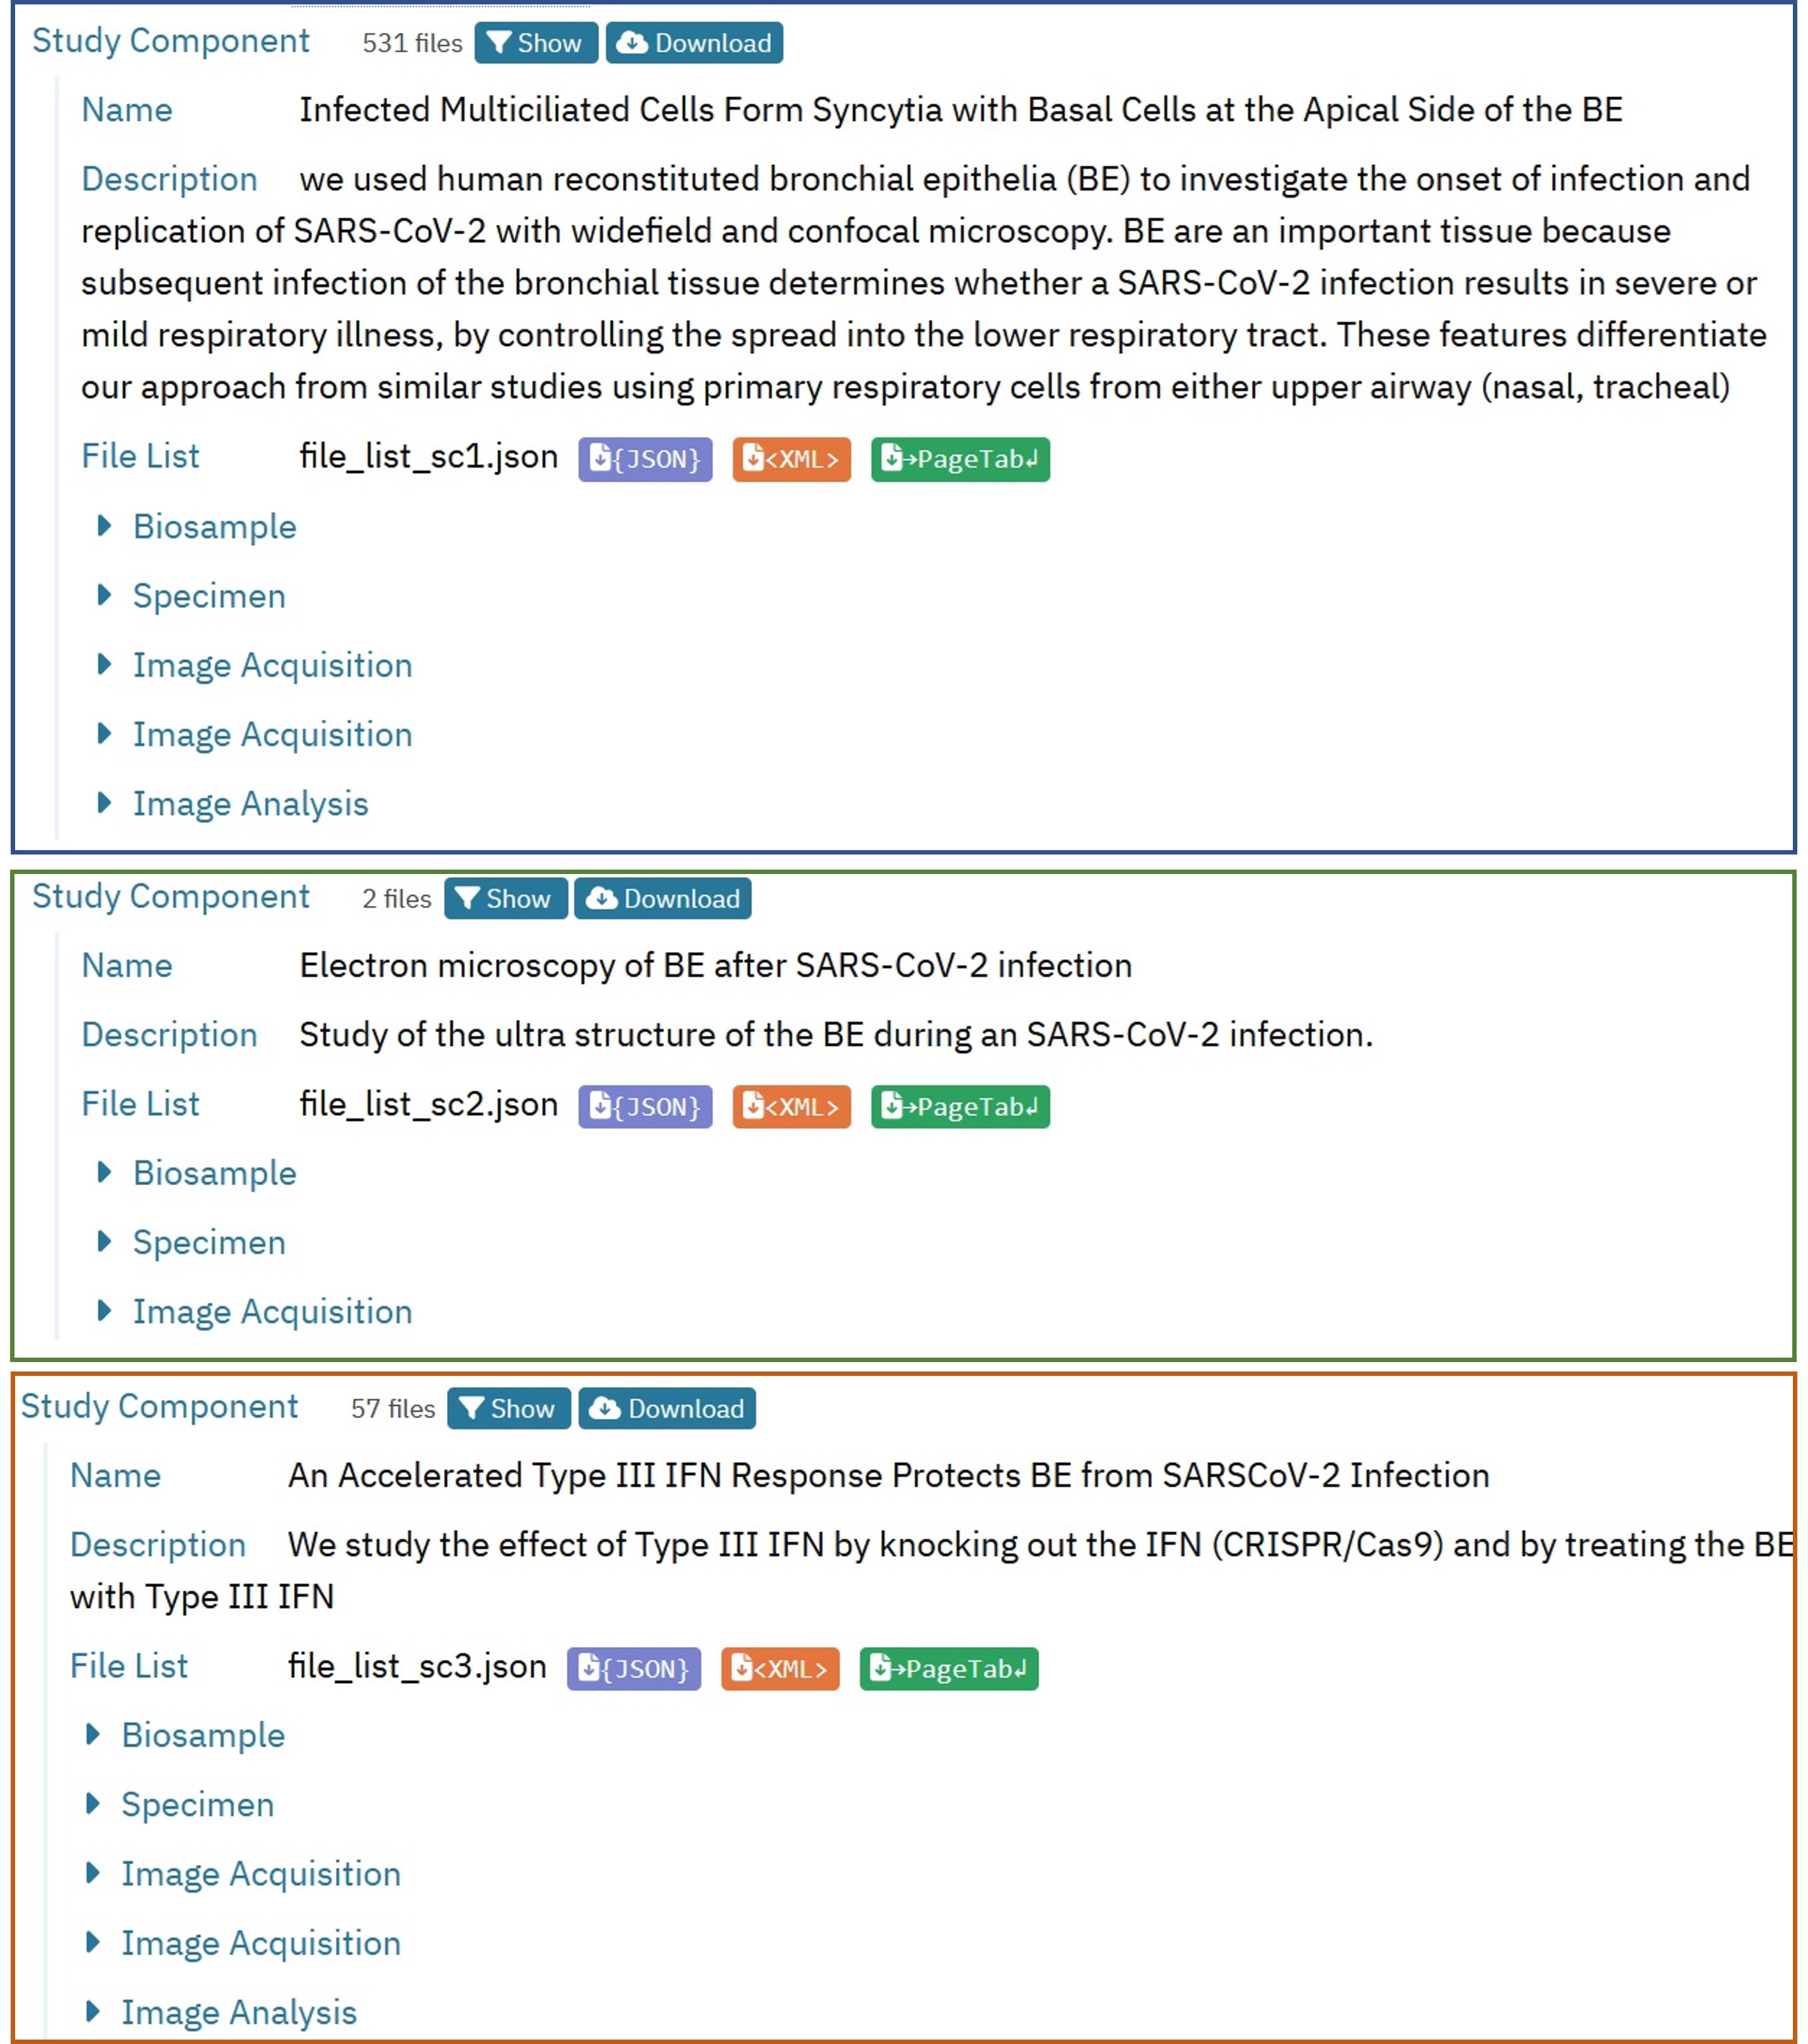
Fig. 7.13 example of multiple study components
Two basic variants of “biosample” were imaged: native bronchial epithelia and genetically altered epithelia (CRISPR knockout of interferon genes). This means that we chose to represent that by two Study Components to distinguish those two biosamples.
For native bronchial epithelia, we have also performed different types of imaging: light microscopy including widefield epifluorescence and confocal microscopy plus some amount of transmission electron microscopy. As each of the three imaging modalities has its own image acquisition procedure, we will require three image acquisition components. The two light microscopy methods share the same sample preparation, so we are grouping them into one Study Component with one ‘biosample’ and one ‘specimen’ but with two ‘image acquisition’ components.
The electron microscopy shares the same ‘biosample’ as light microscopy but does not share the sample preparation, so we have decided to present the electron microscopy as a separate Study Component rather than combining all three imaging modalities into a single Study Component. In this way it is easier to understand the data and to distinguish the electron microscopy component more clearly, as we can give it its own name and description.
The bronchial epithelia with genetic alteration were only imaged using the two light microscopy methods. So the third Study Component contains again two ‘image acquisition’ modules and share the other modules.
Note
This is not the only possible organisation of the dataset, and alternative structures may also have been equally suitable. For example, this dataset could have been described by fewer or even more Study Components. It’s simply a matter of providing all the metadata and ensuring a structure that others can understand.
This process of data organisation is crucial as it determines which metadata needs to be input where and how the File-list (Step 6) will look. Ultimately, it’s essential that all the relevant metadata information is included, not where it is represented. Therefore, already at this stage, you can design what you would like to include in the File-list(s). In a nutshell, a File-list contains all the information about what is different between the files in each Study Component. In our dataset this would for example include whether the images were taken with confocal or epifluorescence microscopy or to which donor the epithelial samples belonged. More details on the File-lists can be found in Step 6.
Now there are two ways to proceed. Either you can follow this recipe and start the deposition by creating a new submission and entering the metadata first and then uploading the files and creating the File-lists. Or you can upload the organised data first (Step 5), then think about and create the File-lists (Step 6), and then afterwards create the submission and enter the missing metadata (Step 4).
7.5.5. Step 4: Upload the data
Several data upload methods are available in the BioImage Archive and different methods are recommended for different data size ranges:
Size |
Submission Method |
|---|---|
less than 50 GB total size & |
Submission tool upload |
up to 1 TB total size |
FTP |
larger than 1 TB |
Aspera |
Once in the BioStudies user interface a ‘secret directory’ will be created for you as a place to upload your data prior to submission.
Note
The secret directory is not intended for long-term storage of your data. Make sure to only upload data that you plan to submit in the near future.
To upload data using the submission portal, simply click on ‘File Upload’. This will allow you to upload the folder(s) you organised in Step 3.

Fig. 7.14 the file upload interface of BioImage Archive
For the example dataset it is recommended to use file transfer via FTP. This requires an FTP client and, we will use the freely available Filezilla. For instructions and login details for FTP and Aspera uploads, please select the ‘FTP/Aspera’ button. To connect to the server the credentials provided under this tab (host, username, password) should be entered in the FTP client and the files will be uploaded to the remote site , which is unique for every user.
7.5.6. Step 5: Create the submission
To create a new submission, click on “New Submission” in the top right of the Biostudies account and select “BioImage Archive Study”. You will then be able to enter the relevant metadata for the new submission.

Fig. 7.15 new submission in submission tool
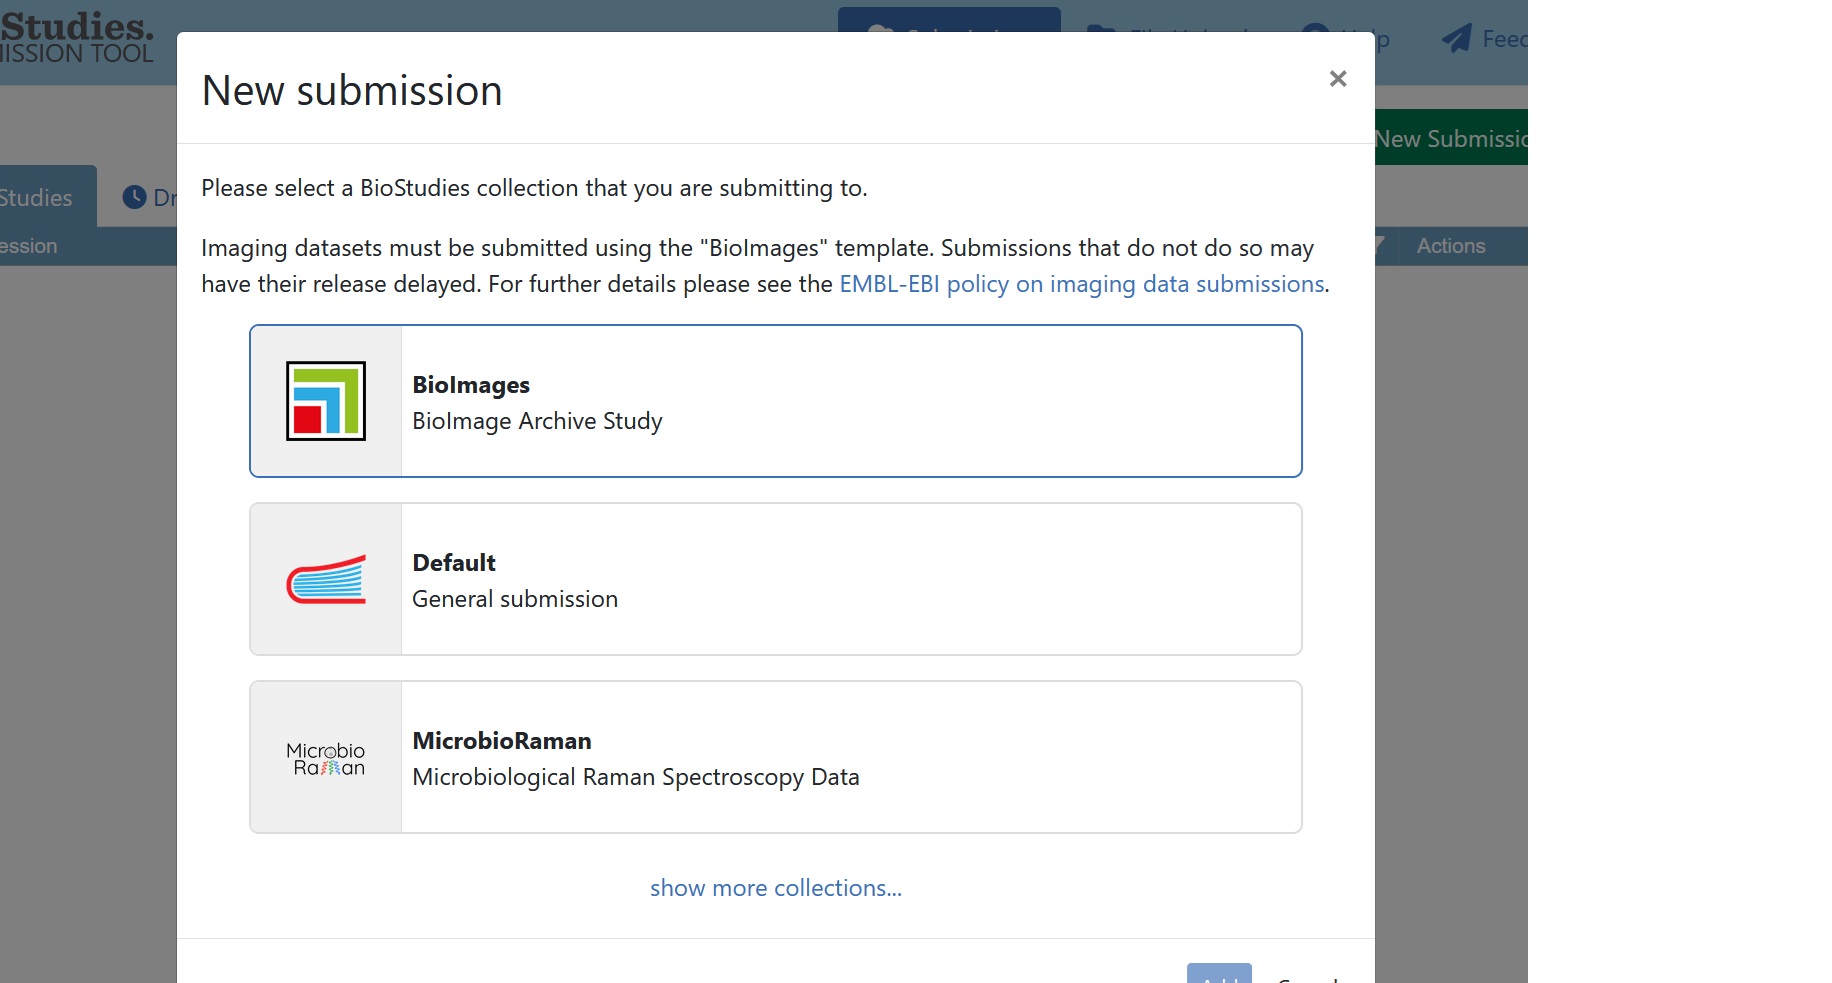
Fig. 7.16 select BioImage Archive study
Tip
It is also possible to generate and submit the study-level and Study Component metadata using alternative methods to the submission portal, for example YAML files. Further details can be found on the BioImage Archive GitHub page or by contacting the Archive directly
7.5.6.1. Input the Study-level metadata
BioImage Archive employs REMBI, so the submission interface is structured accordingly. The first component of REMBI is the ‘Study’, which also is the first section of every BioImage Archive entry. This includes details about the current submission, authors, and the corresponding paper. Some fields will have free-text boxes, while others will have dropdown menus. If a particular item is not available in the dropdown menu, you can enter free text there instead.
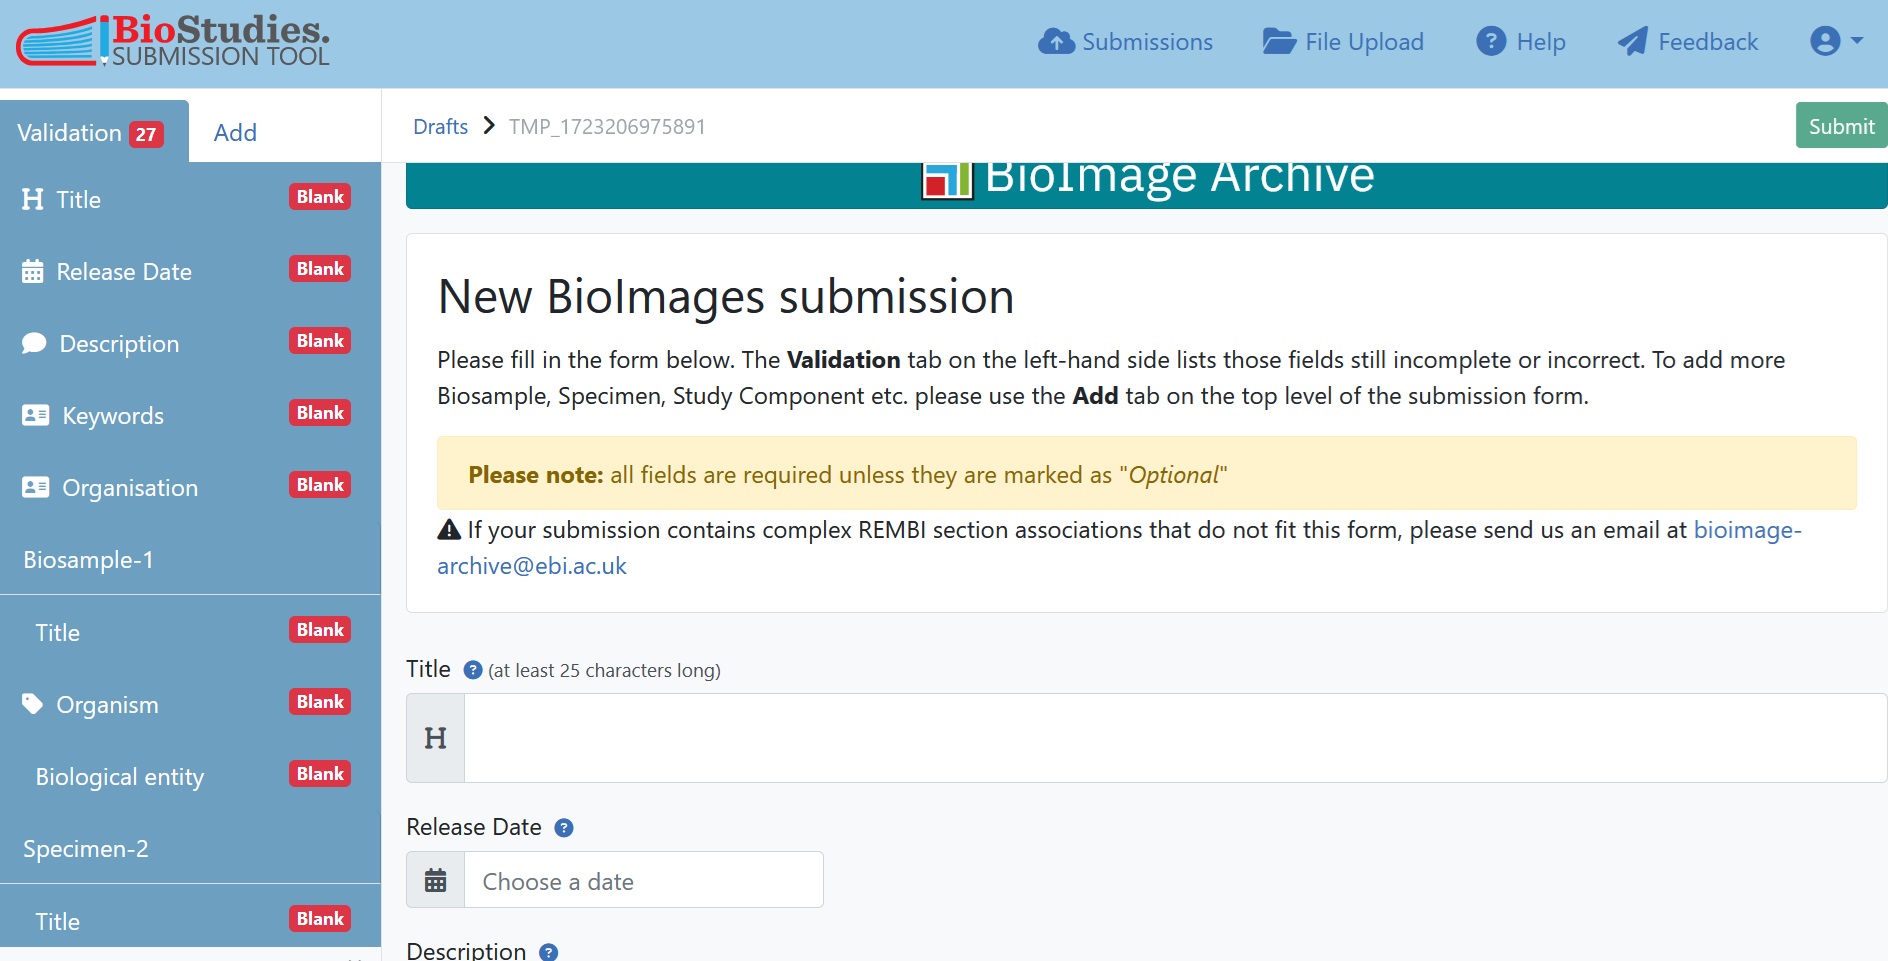
Fig. 7.17 Overview of submission portal
Ensure that every dataset author is correctly associated with the appropriate roles. It is also important to acknowledge the contributions of core facility staff involved in the generation of the data and data stewards involved in the submission process, even if they did not become authors of the paper.
Note
The study persons refer to people involved in image data generation, analysis and submission and do not have to be the same as the authors of the corresponding paper.
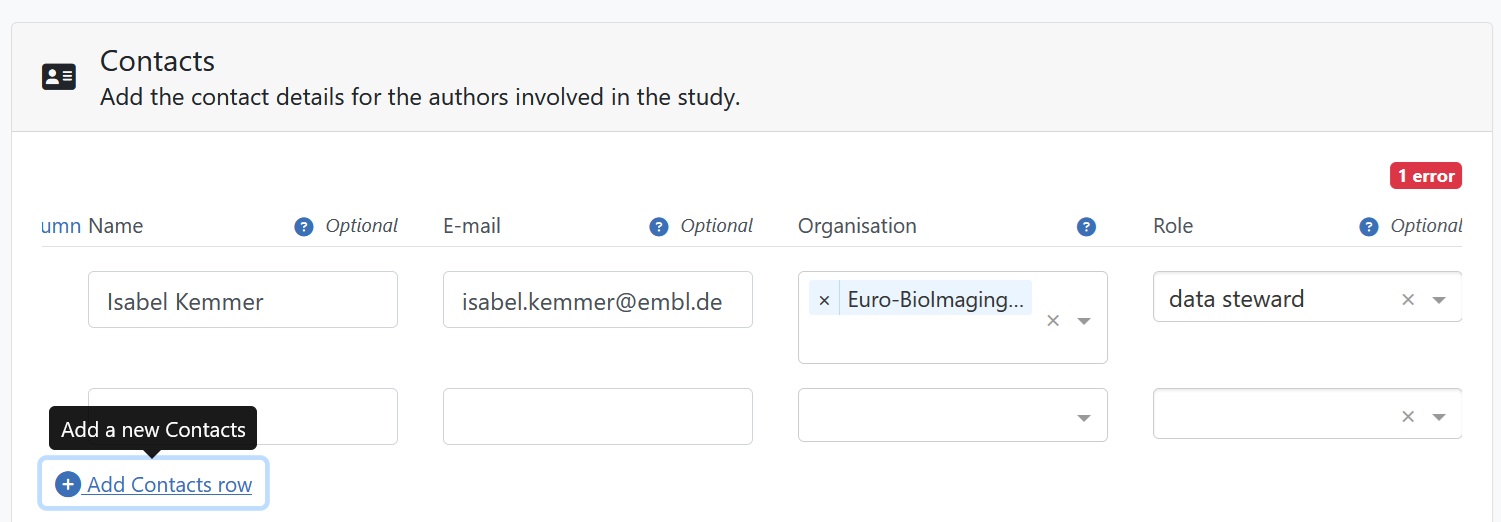
Fig. 7.18 author roles in BioImage Archive
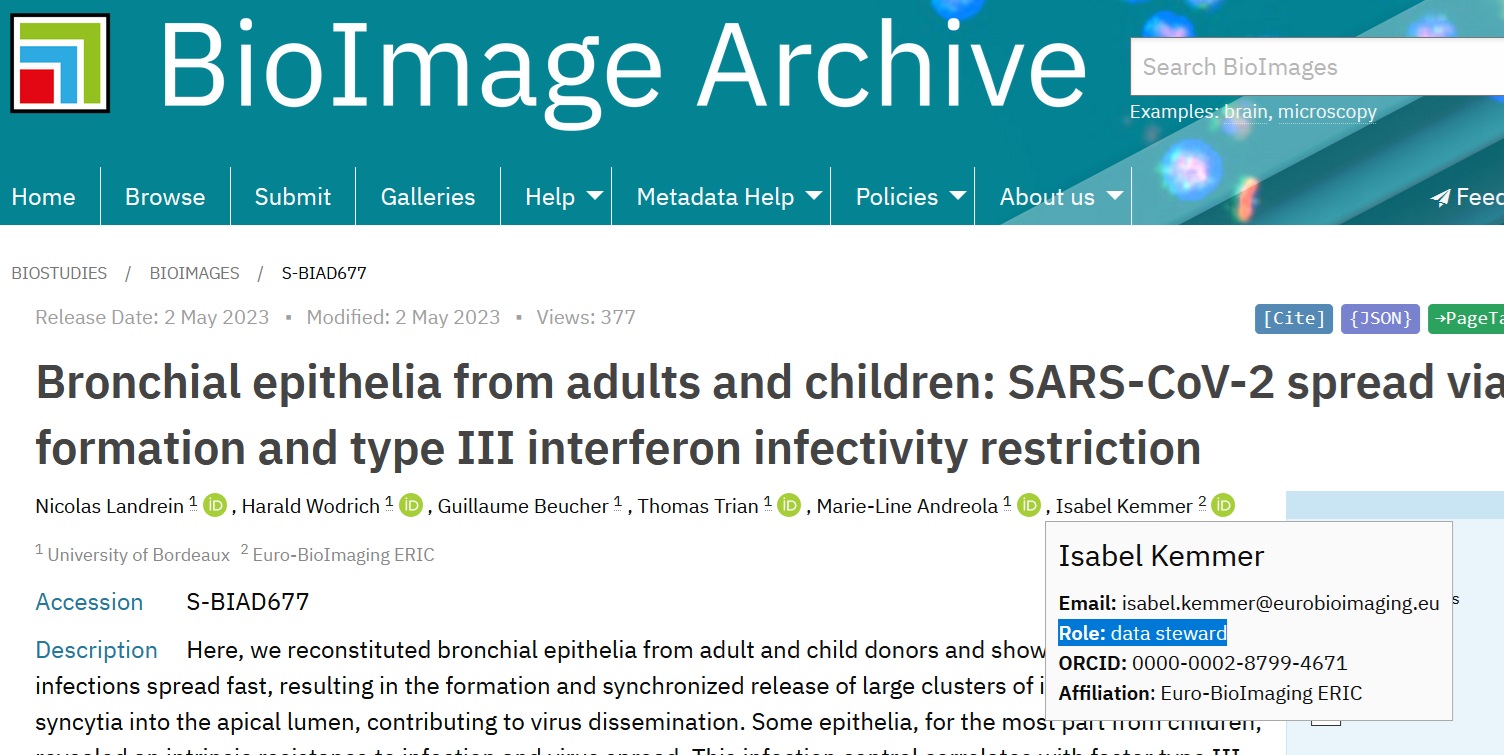
Fig. 7.19 author roles in BioImage Archive
7.5.6.2. Input the Experiment metadata
Once you have entered the study-level metadata, the other REMBI components will be listed at the bottom of the page. For studies with a single linear assay, the experiment metadata can be entered in each REMBI component as is.
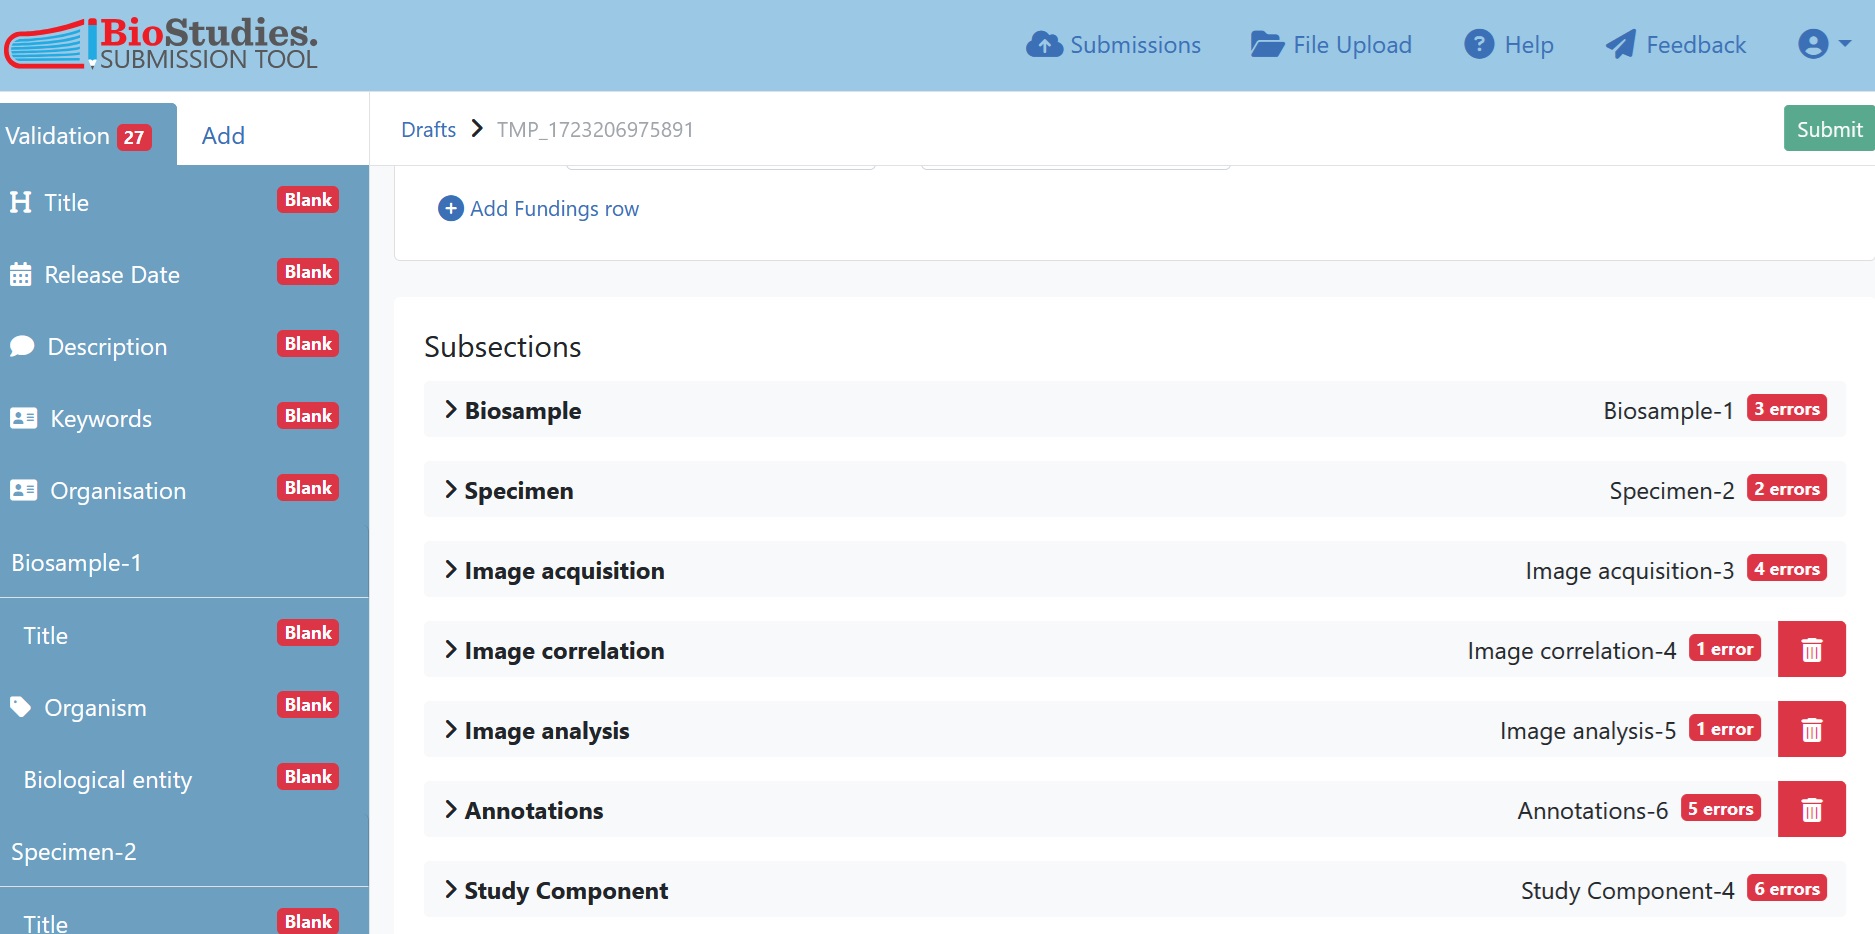
Fig. 7.20 subsections of REMBI components
As a general guide for metadata, give as much information as necessary to understand what you have done in order to arrive at the deposited images. If possible describe your procedures, materials and outcomes using terms from controlled vocabulary and according to an ontology so that findability and interoperability are ensured.
As for the study-level metadata, information can be provided in free-text boxes or dropdown menus and should particular items not be available in the dropdown free-text can be also entered there. Please keep in mind that the wording of the dropdown menu is already in accordance with controlled vocabularies or ontologies and therefore should be preferred.
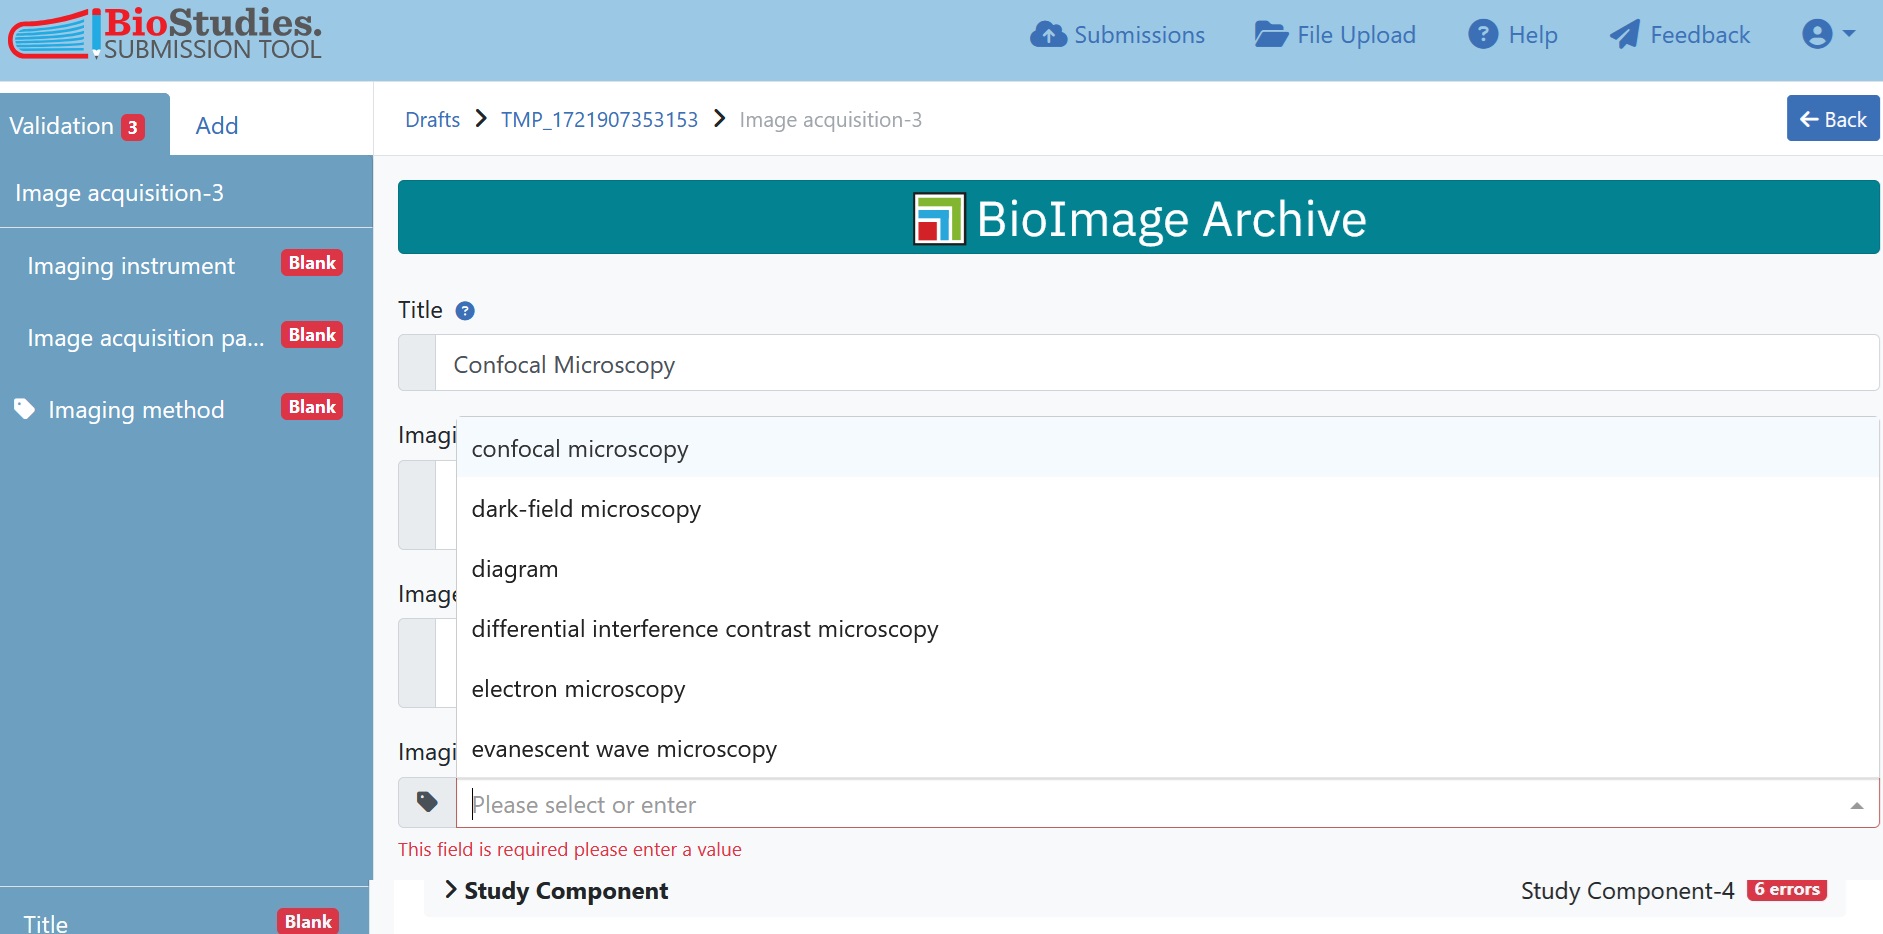
Fig. 7.21 drop-down menu of imaging method
7.5.6.3. Duplicating REMBI components
If the record contains multiple Study Components and/or multiple variants of REMBI components, it is important to ensure that this complex organisation is properly reflected in the submission interface. This is the case in the current example, where we have three Study Components and within each of these, some duplicated REMBI components. To add components click on “add” in the top left corner and select the section to duplicate. In this case we selected “Image acquisition” as this will give us another blank copy of the image acquisition sheet. We enter here the information of the second image acquisition parameters, in this case the epifluorescence microscopy.
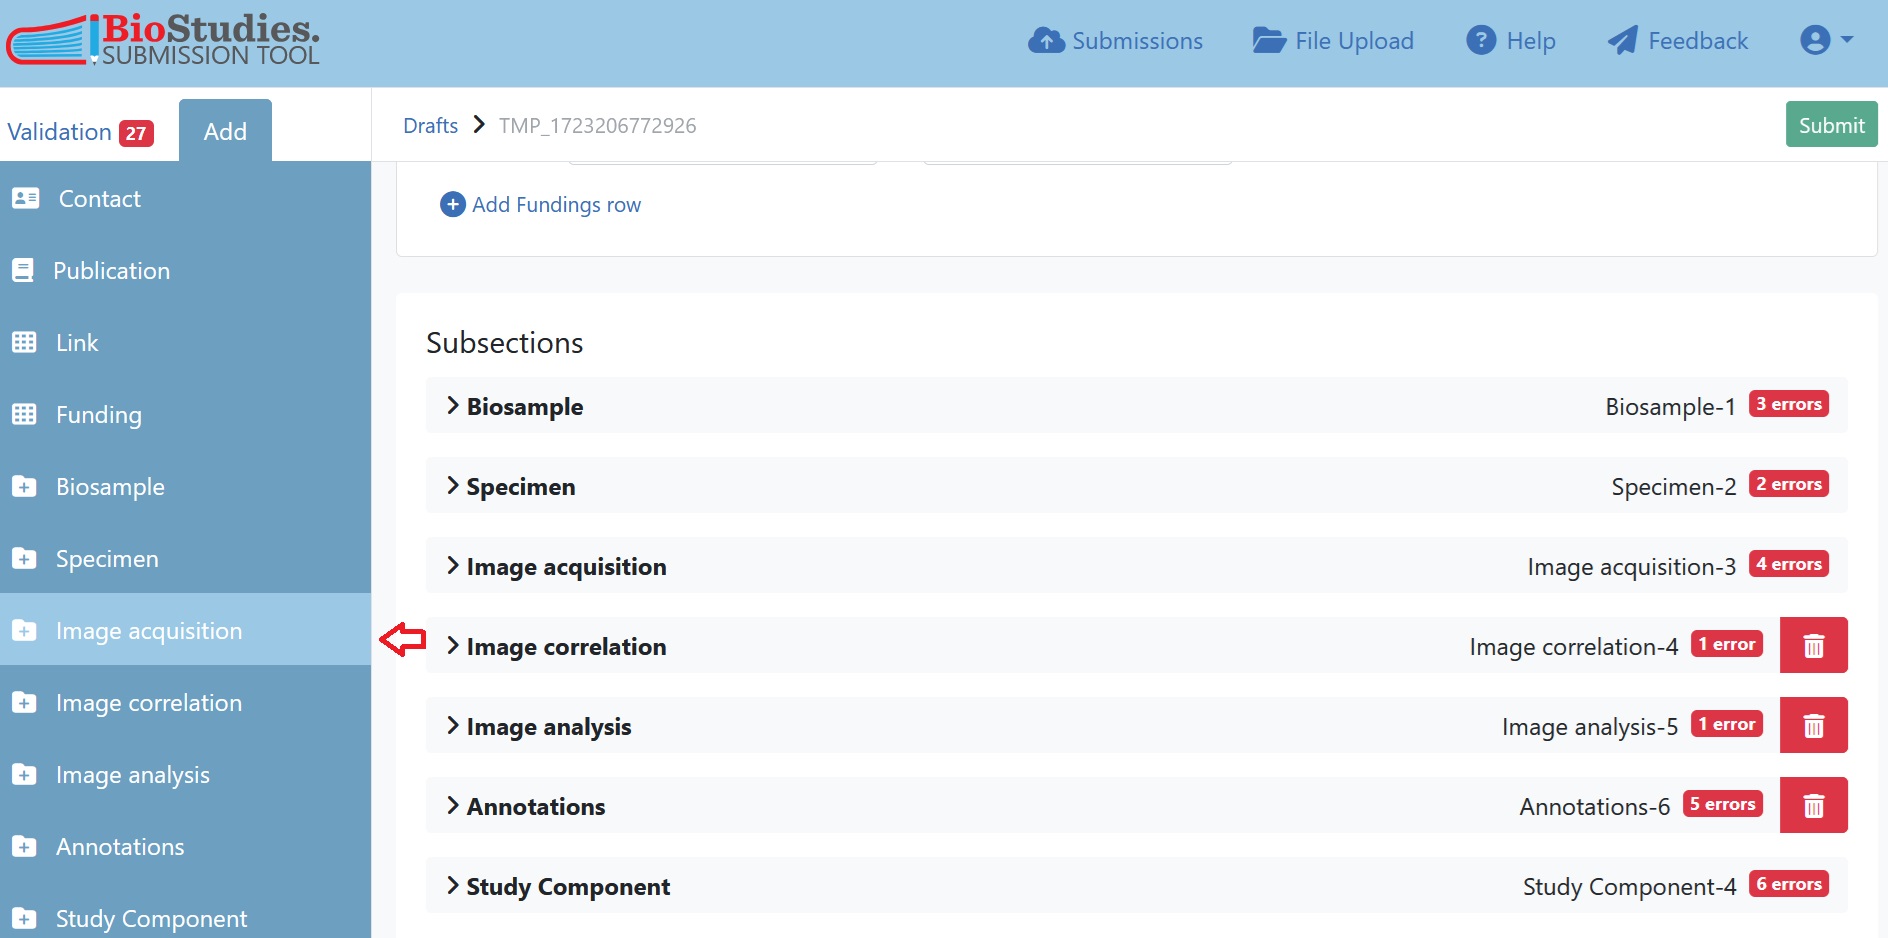
Fig. 7.22 add study components in submission portal
For the example, we need in total 3 Biosample components, 3 Specimen components, 3 Image acquisition components (the image acquisition protocol is the same between the native and the genetically altered epithelia, otherwise we would have needed 5 image acquisition components) and 3 Image analysis components.
7.5.6.4. Study Component associations
Now we need to bring everything together inside the Study Components. Select the Study Component tab and enter a meaningful name and description for each Study Component. It is now necessary to assign the corresponding REMBI components to the previously defined Study Components (Step 3). If you have only one Study Component, simply assign all REMBI components to the already existing Study Component. In the example dataset we decided on three Study Components so we also need to create two more Study Components which can be done like for any other REMBI component as described above (Step 3).
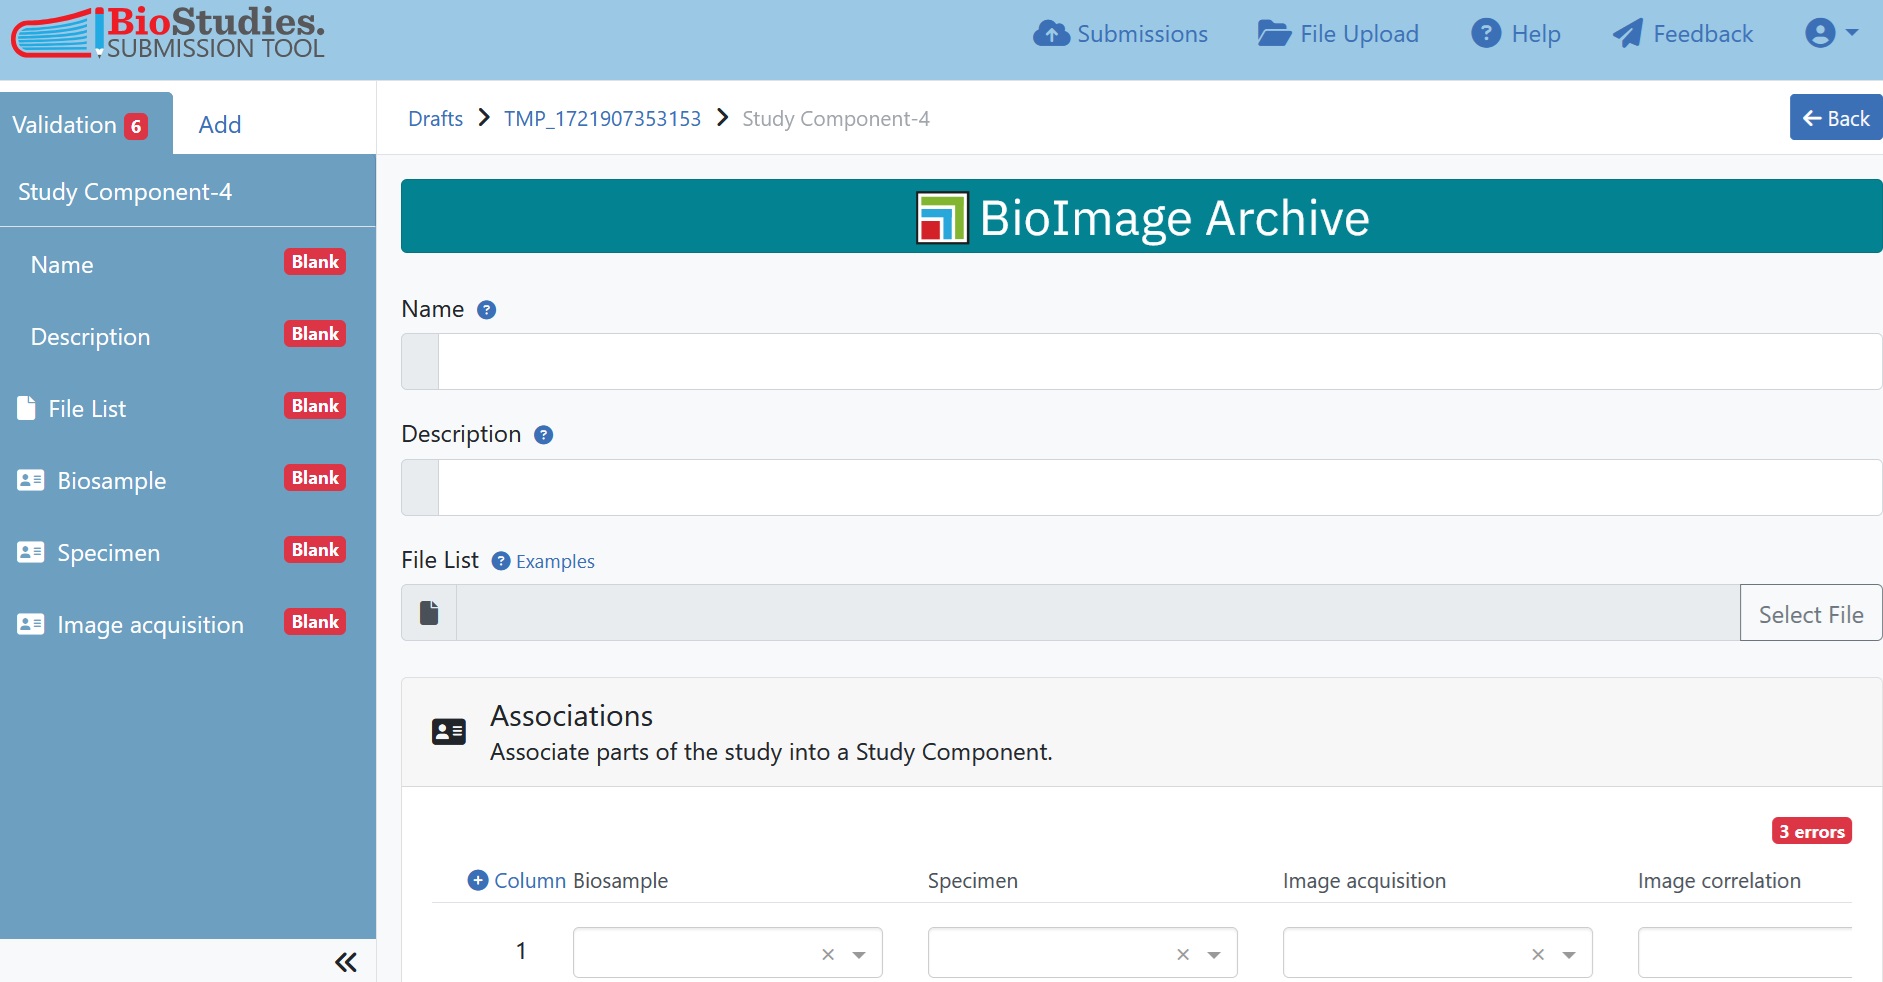
Fig. 7.23 study component information
Note
We leave the File-list empty for now since we are only generating those in the next Step. If you have already created them because you chose the other route then you can also already associate the corresponding File-list.
If you have duplicate REMBI components in one Study Component, such as confocal and epifluorescence microscopy in the example dataset, you can add association rows to match this structure.
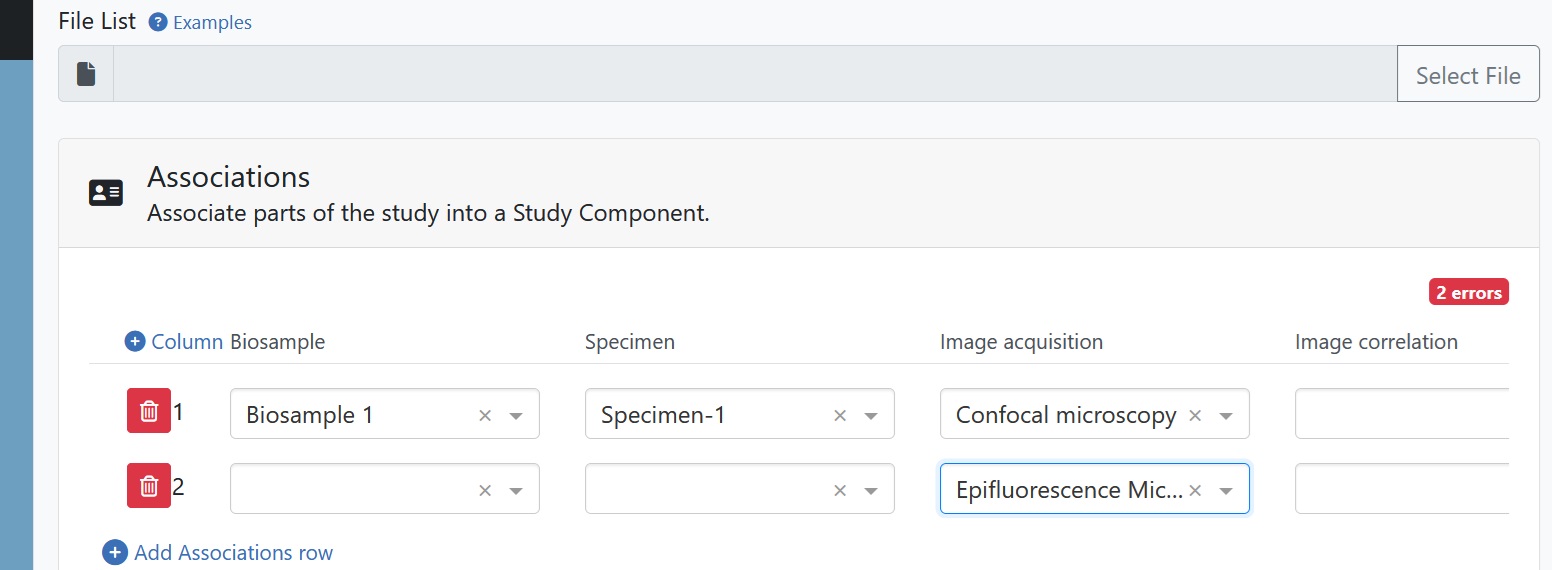
Fig. 7.24 study component associations
7.5.7. Step 6: Generate the File-list
One of the key elements of a BioImage Archive submission is the File-list, which acts as a “table of contents” for the files included in the submission. This encompasses both image files and other supporting files, such as analysis results. The File-list is crucial because it provides detailed metadata about each data file, enabling others to easily understand the context and significance of each file. There must be exactly one File-list for each Study Component. For this reason, it is practical to organise the data so that there is one folder per Study Component. The first column of this tab-delimited file (.tsv, .xlsx) lists the file names and their relative paths, so that there is exactly one row for each file included in a Study Component. Further columns will then detail the file-level metadata.
When all data is uploaded, the File-list template(s) can be automatically generated over the file upload portal. For this click again on “File upload” in the top bar and for each folder, representing one Study Component, you can now download a File-list template which already lists all the files inside one folder.

Fig. 7.25 tool to download File-list
Tip
It is also possible to have a File-list that collects files from a number of different folders, as may be necessary if a Study Component is not inside a single folder but spread across multiple folders. In this case, however, the File-list must be created in a different way elsewhere.
Once you have downloaded the empty File-list using the submission tool, you need to locally edit the File-list to include additional columns describing file-level metadata. Therefore, you need to think about what file-level metadata is essential to include so that others can understand the differences between each file in a Study Component. For each metadata item create one extra column in the File-list. You can either add more columns directly to the generated File-list or, alternatively, copy and paste the “Files” column into another template.
Note
This submission tool only generates a File-list with a single column listing all files (recursively, i.e. all files in all subdirectories) and their paths, but no suggestions for additional metadata columns.
It is helpful to look at some example File-lists for different types of studies to get suggestions for metadata in different studies and further guidance on File-lists.
In the example dataset we have several types of metadata, which are described in more detail in the File-list. Of course this is just an example and the amount of additional information and thus column names will greatly vary between studies. If we had chosen for a different organization in the example dataset, some of this information may already have been described in the general metadata section.
Category |
File-list column |
Additional description |
|---|---|---|
Experiment |
Study-component |
which Study Component the image belongs to |
Experiment |
data-type |
raw / processed image |
Experiment |
linked_to_figure |
which figure in the paper the image belongs to |
Experiment |
associated_metadata |
whether metadata is included in the image files |
Biosample |
donor age |
Adult / Child |
Biosample |
donor ID |
A1-A12 / C1-C8 |
Biosample |
infection |
yes / no |
Biosample |
time |
days post infection |
Biosample |
genetic alteration |
IFN-λ gene knockout using CRISPR/Cas9 |
Biosample |
IFN-addition |
concentration of IFN-addition |
Image Acqusition |
microscope-type |
confocal, widefield or electron microscopy |
Image Acqusition |
magnification |
from 10x to 6000x |
Image Acqusition |
x,y resolution |
in nm |
Image Acqusition |
z resolution |
in mn |
Image file |
view |
X,Y,Z-section or hyperstack |
Image file |
channels |
how many channels are present in the image |
Image file |
stained cell type |
goblet, basal or ciliated cells |
Image file |
stained antibody |
names of antibodies |
Image file |
stained cellular component |
Nucleus, Actin, protein N, MUC5AC |
Once you have decided on the additional columns for the File-list, you must fill in the corresponding values for each file in the submission. If files do not have a value for a specific column these can be left empty.
Tip
You can also programmatically generate the completed File List, including the additional metadata columns and content, which is particularly beneficial for large datasets..
Once you have completed the File-list(s), proceed to upload them again in the submission portal. The File-list can be either uploaded to the corresponding Study Component folders if they are available, or alternatively, they can be uploaded without a folder. If you have multiple File-lists, please ensure that you name them clearly and distinctively.
7.5.7.1. Associating the File-lists
After having uploaded one File-list per Study Component, we go back to the prepared submission. For this we click again on “Submission” in the top bar. Then we will select the current submission from the “Draft” category.
Earlier (Step 5) we had already generated and described the Study Components present in our submission. We go now again to each of the Study Components and associate the corresponding File-lists to each Study Component, making sure that we have one File-list per Study Component.
7.5.8. Optional: Annotations
When image files are accompanied by annotations, these may also be submitted to the BioImage Archive. In the present example, no annotations are available, however, a brief overview of this process is outlined below.
The metadata for annotations are provided in accordance with the MIFA standard.
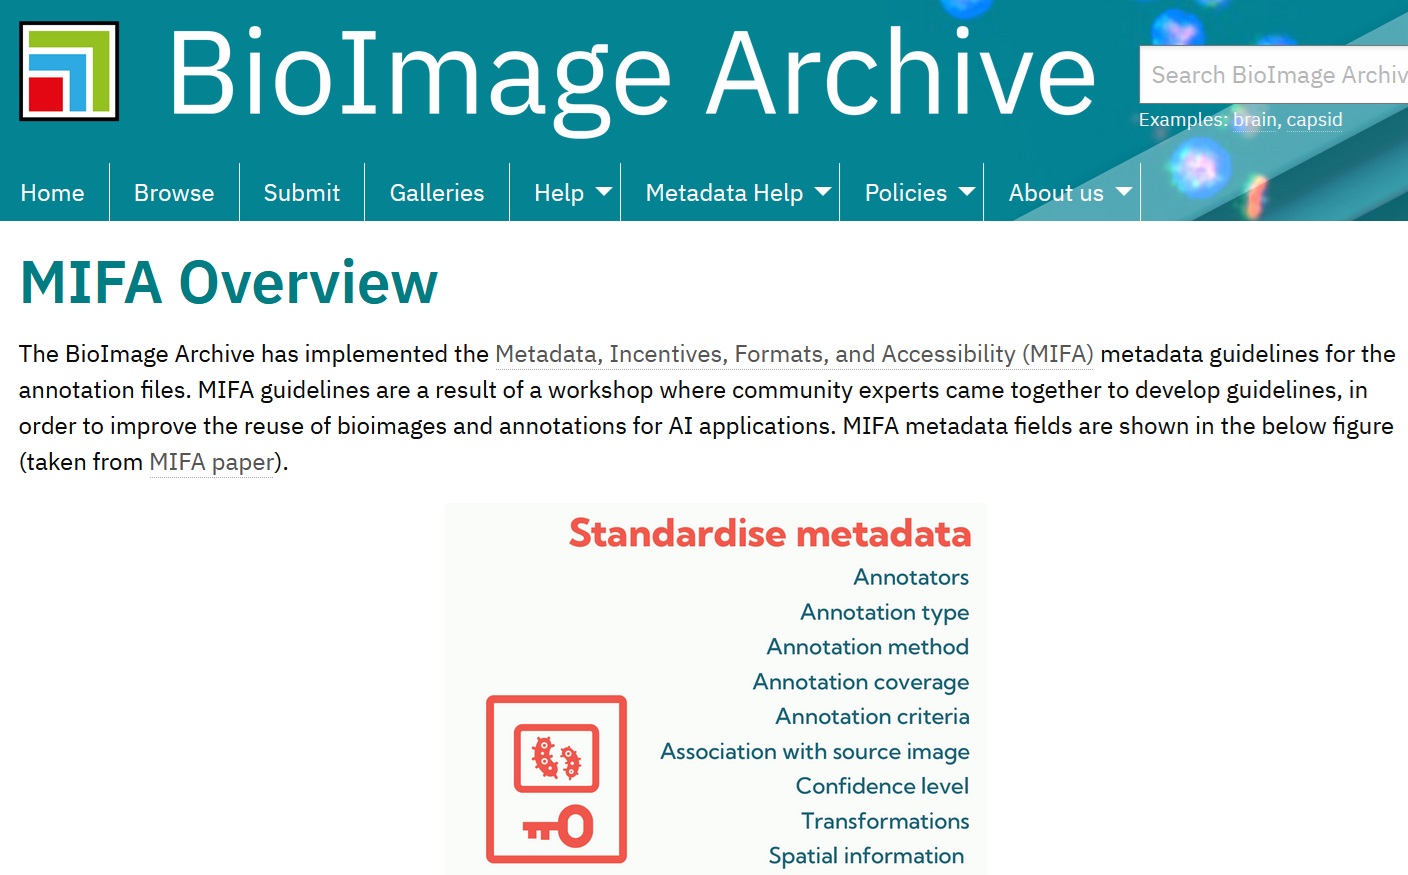
Fig. 7.26 the MIFA standard for annotations
Annotations are also one component of the submission interface; they are treated similar to whole Study Components.
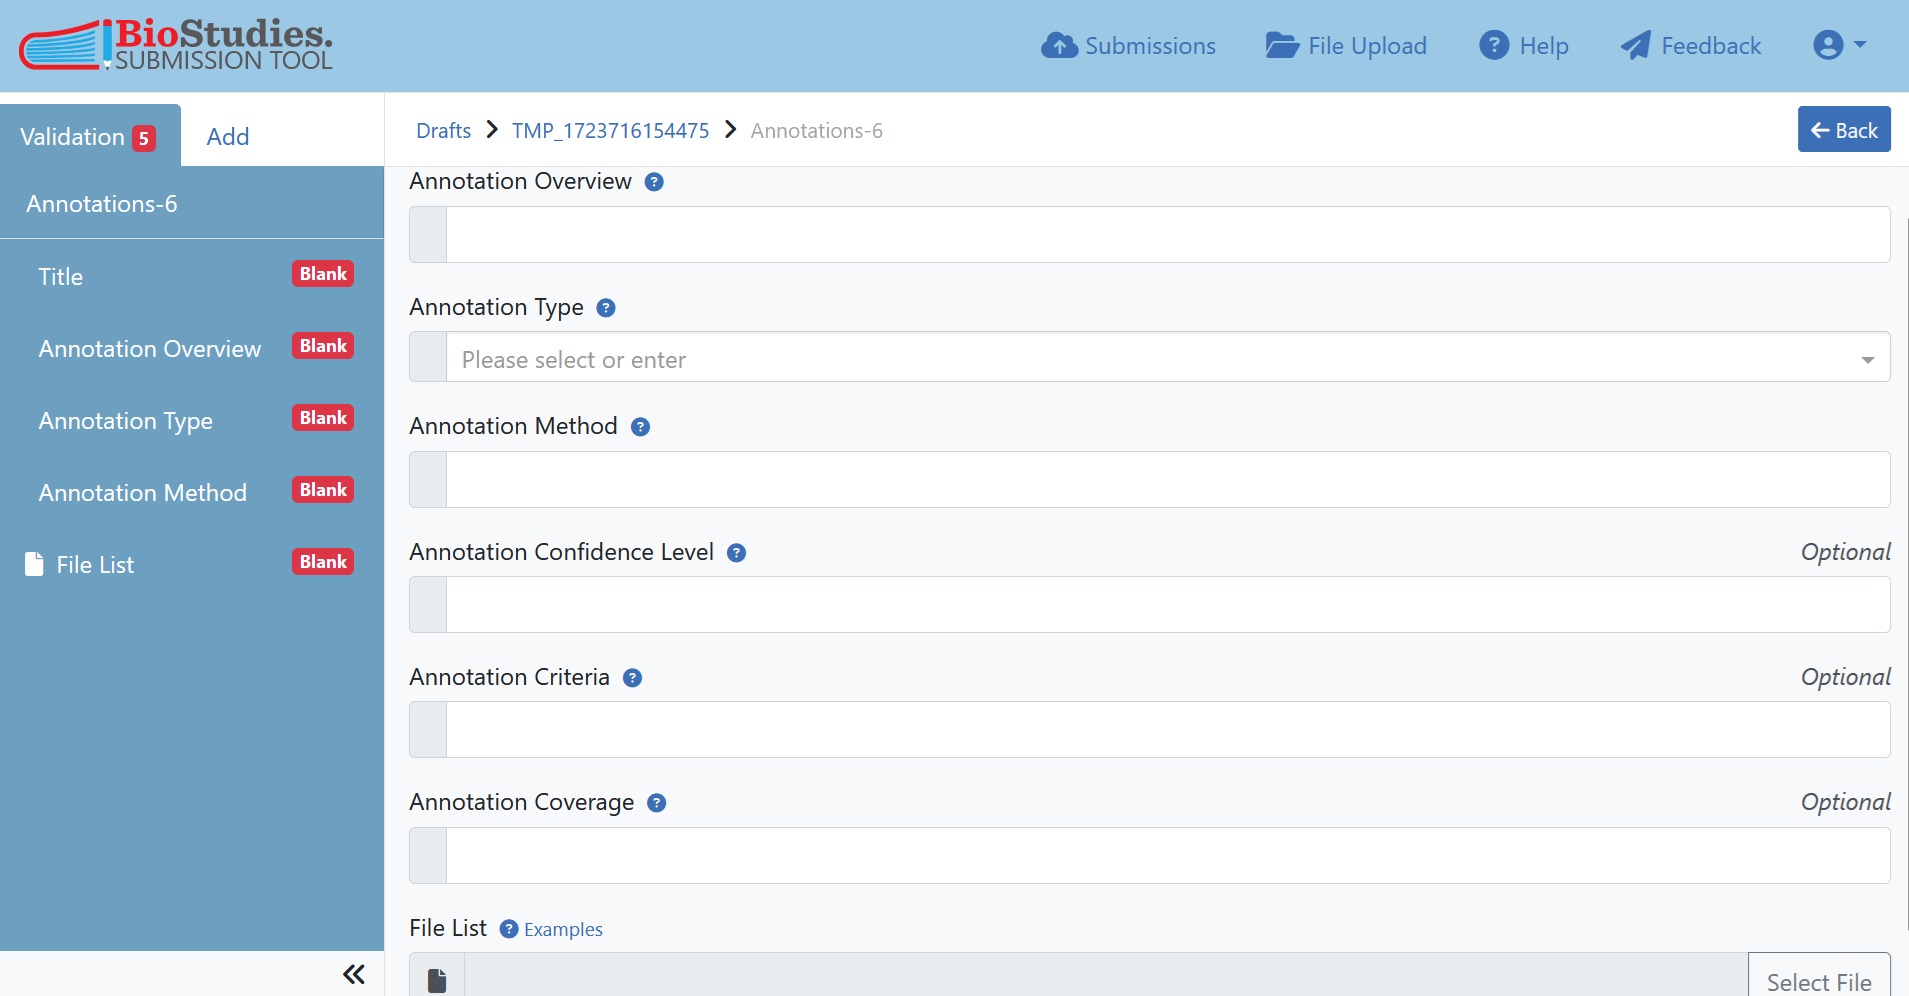
Fig. 7.27 annotations
Note
It is necessary to create a separate File-list for annotations, in the same way that a File-list is required for each Study Component.
The File-list for annotations should always contain a column that relates the annotations to the images you have uploaded (i.e. column name “related_image”) and gives the path to that image. Otherwise, you should select the most appropriate metadata for your type of annotations, as you would for images.
7.5.9. Step 8: Submit your data
Now that all data is uploaded, the File-list(s) are associated and all metadata is entered in the portal you are ready for submission. When you have checked that all the information is correct, click on ‘submit’ to complete the submission.
Upon successful submission, a unique BioImage Archive accession number will be assigned to your dataset, which serves as a unique identifier within the archive. Additionally, your dataset will get a DOI. You will then be directed to a confirmation window, where you will find instructions on how to access and share your study with others.
Note
Your submission will not be available to the public until the specified release date. However reviewers of a manuscript may receive blind access to the data before paper publication.
7.6. Conclusion
By depositing your image data in the BioImage Archive, it will be findable and accessible as your data will be assigned a persistent identifier and will be downloadable using a standard access protocol. Depending on the depth and quality of the metadata provided, your dataset will now be FAIR. By making your data openly available for reuse you have made an important contribution to open science and scientific progress. It is also great for you, because now people will be able to find your data from the paper and vice versa, giving you more recognition for your work as a scientist.
7.7. References
References
- 1
U. Sarkans, W. Chiu, L. Collinson, M. C. Darrow, J. Ellenberg, D. Grunwald, J. K. Hériché, A. Iudin, G. G. Martins, T. Meehan, K. Narayan, A. Patwardhan, M. R. G. Russell, H. R. Saibil, C. Strambio-De-Castillia, J. R. Swedlow, C. Tischer, V. Uhlmann, P. Verkade, M. Barlow, O. Bayraktar, E. Birney, C. Catavitello, C. Cawthorne, S. Wagner-Conrad, E. Duke, P. Paul-Gilloteaux, E. Gustin, M. Harkiolaki, P. Kankaanpää, T. Lemberger, J. McEntyre, J. Moore, A. W. Nicholls, S. Onami, H. Parkinson, M. Parsons, M. Romanchikova, N. Sofroniew, J. Swoger, N. Utz, L. M. Voortman, F. Wong, P. Zhang, G. J. Kleywegt, and A. Brazma. REMBI: Recommended Metadata for Biological Images-enabling reuse of microscopy data in biology. Nat Methods, 18(12):1418–1422, 12 2021.
7.8. Funding
Funding
The this recipe was generated with funding from EU Horizon 2020 under grant agreement no. 101046203 (BY-COVID).