8. Developing FAIR API for the Web

Note
This recipe was originally write for the NIH Common Fund Data Ecosystem and is reproduced here for convenience.
Authors: Daniel J. B. Clarke
Maintainers: Daniel J. B. Clarke
Version: 1.1
License: CC0 1.0 Universal (CC0 1.0) Public Domain Dedication
8.1. Background
An Application Programming Interface (API) refers to a mechanism for interfacing with a web service programmatically. Unlike a Graphical User Interface (GUI) designed to be used by an end-user, API are designed to be used by other computer programs. Designing and documenting an API for an application enables your application to be more interoperable with, and ultimately more reused, by other applications. Depending on the type of application, there are different ways to design APIs. Most important is that APIs should be documented well. We will not cover FAIR APIs of software libraries, but instead focus on developing FAIR APIs for the web.
More and more web-based applications are becoming available every day. These applications typically perform complex operations on large databases. While web-based applications provide users with the capacity to access a tool, a database, or other resource programmatically, they are not always able to interoperate with other independent web applications. A web-based application that offers a FAIR API is more accessible to operating as part of workflows, or integration systems such as semantic search engines. This makes FAIR API development very relevant for data catalogs or web tools developed by the CF DCCs.
While a slew of standards exist for web API development and documentation, each has their own level of FAIRness. Here we are going to focus on RESTful APIs, which can be described with OpenAPI (previously Swagger) to take advantage of RESTful API flexibility while still permitting machine readable introspection. Several other standards are machine readable by default, including SOAP, SPARQL or GraphQL among many others, but despite this, RESTful APIs are the most widely used because of their low barrier to entry. Some standards exist for RESTful APIs, in many cases, these can also be described by OpenAPI. We will consider a specific extension of OpenAPI: Smart-API, which adds a few additional fields and also has its own get-started guide.
8.2. Motivation
Documenting APIs or building them from the ground up with SmartAPI in mind have a number of advantages:
Human readable documentation of that API with a number of packages that can generate it from the OpenAPI schema
Server/client libraries from a number of packages that can generate them for numerous programming languages based on the OpenAPI schema
People can access your application features using their favorite programming language
People can create an application that shares the same API as another application for interoperability
Enabling simple use cases like enhancing findability with API Catalogs
Enabling future use cases
SmartAPI specifications inherit all of the benefits of OpenAPI, while adding the potential for interoperability with RDF semantically linked data. This can help enable future use cases like BioThings API, powering semantically linked APIs for biomedical knowledge exploration.
8.3. Ingredients
Web Application
Existing API Documentation
OpenAPI/SmartAPI Editor (see step 1)
8.4. Objectives
We will look at the existing REST service provided by the Metabolomics Workbench catalog: https://www.metabolomicsworkbench.org/tools/mw_rest.php. This API is described for human consumption, including examples for each endpoint. We will tackle some of the endpoints using OpenAPI.
Although OpenAPI can be edited by most standards editors because it is typically written in YAML (a slightly ‘nicer’ version of JSON that is equivalent), it is helpful to use an OpenAPI editor like https://app.swaggerhub.com/home. This will catch errors as you edit, and permit testing of the endpoints as you encode immediately.
An example endpoint in an OpenAPI Editor:
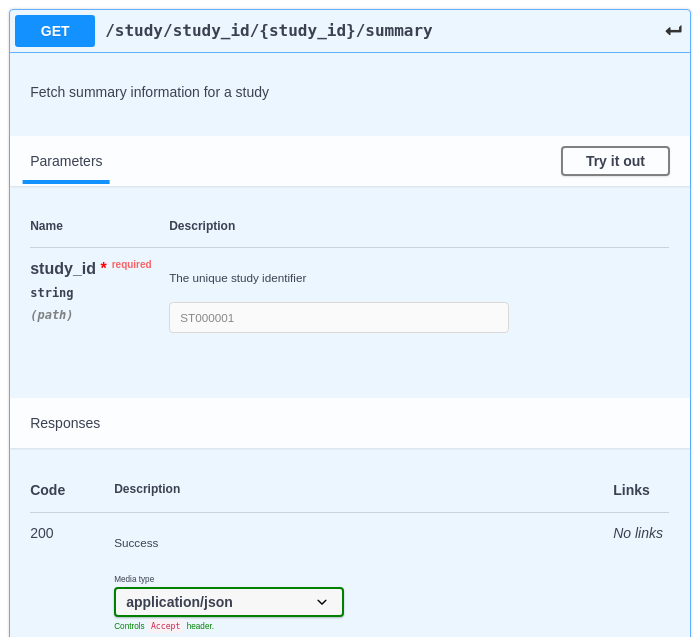
Fig. 8.4 An example endpoint in an OpenAPI Editor
A real response in an OpenAPI Editor:
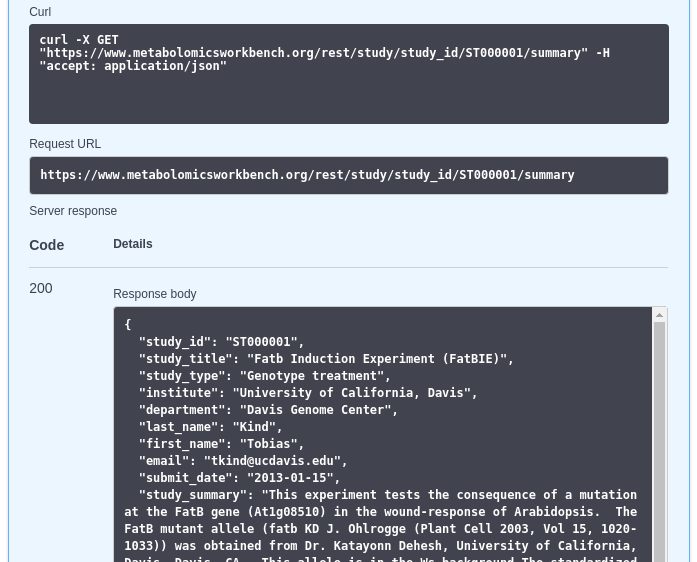
Fig. 8.5 A real response in an OpenAPI Editor
8.5. Recipe
The complete swagger.yaml constructed in this recipe is available here for your reference,
it will be valuable to follow the tutorial and construct it iteratively.
8.5.1. Step 1: Setting up the OpenAPI Editor
Several options exist, including the Swagger Editor, especially with APIs that are enabled to support CORS. Unfortunately, the API we will work with here does not, so we will need to obtain a Swagger Editor that can operate even when CORS is not enabled. Because the de-facto swagger editor is a web-app, most editors have this issue. We specifically modified an Open Source Visual Studio Code Extension so that it supports this specific use case.
Until our pull request is merged, the modified extension can be accessed here.
The vsix file can be installed with Visual Studio Code.
It can be installed from Ctrl+Shift+P with the action “Install from VSIX”

Fig. 8.6 Install from VSIX dialog
And selecting the .vsix file you downloaded.
Once installed, a swagger file can be edited by opening the swagger.yaml (that we will be writing throughout the rest of
the recipe), using Ctrl+Shift+P again and choosing the action “Preview Swagger”.

Fig. 8.7 Previewing swagger
The result will be a webview that opens to the side with the Swagger Editor.
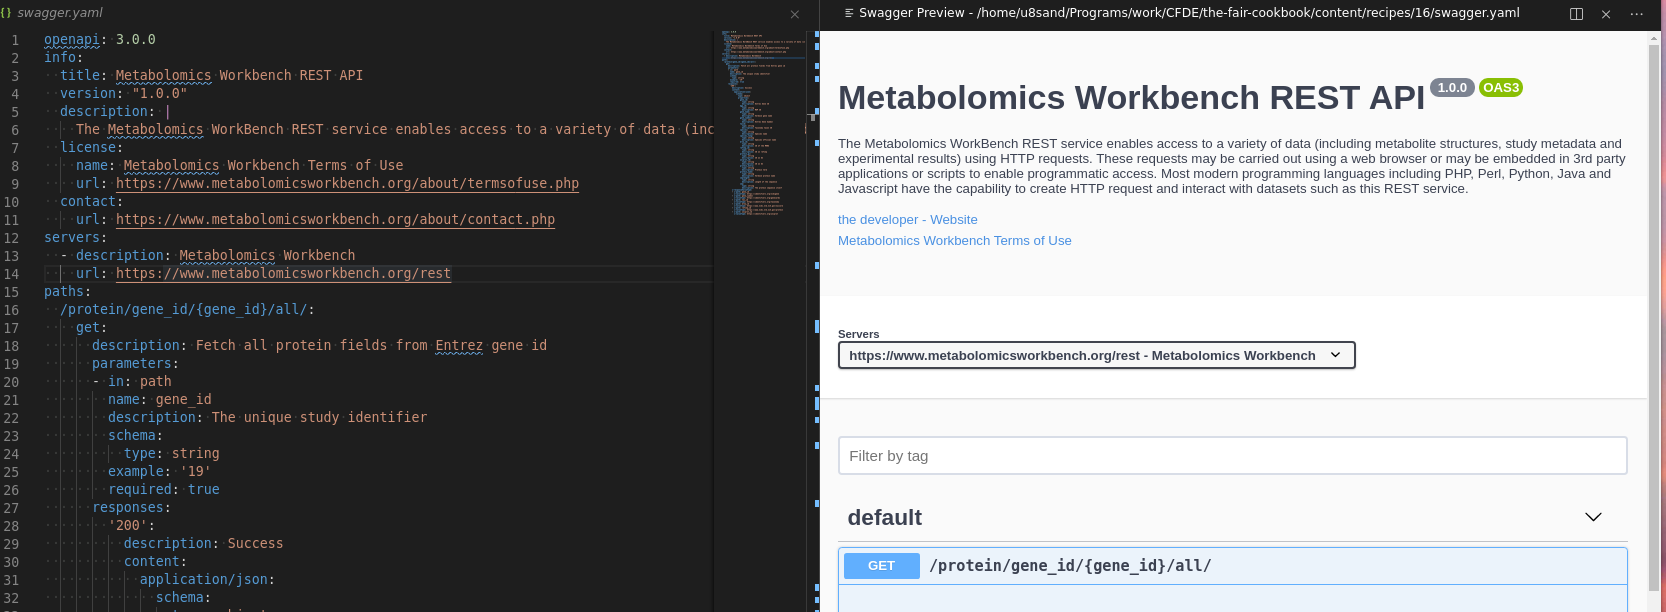
Fig. 8.8 Swagger Editor
Edits to the file will update the view in real time, and the view may be used to craft/test API requests.
8.5.2. Step 2: Beginning an OpenAPI specification
We start by annotating useful descriptions for the API in the info field, this includes adding descriptors, version, license, and contact information. This gives your API an identity and this way it can be used in OpenAPI catalogs, for which there are several including SmartAPI, making it possible to find your own APIs.
The servers field has the base url(s) for accessing the API we’re about to describe.
openapi: 3.0.0
info:
  title: Metabolomics Workbench REST API
  version: "1.0.0"
  description: |
    The Metabolomics WorkBench REST service enables access to a variety of data (including metabolite structures, study metadata and experimental results) using HTTP requests. These requests may be carried out using a web browser or may be embedded in 3rd party applications or scripts to enable programmatic access. Most modern programming languages including PHP, Perl, Python, Java and Javascript have the capability to create HTTP request and interact with datasets such as this REST service.
  license:
    name: Metabolomics Workbench Terms of Use
    url: https://www.metabolomicsworkbench.org/about/termsofuse.php
  contact:
    url: https://www.metabolomicsworkbench.org/about/contact.php
servers:
  - description: Metabolomics Workbench
    url: https://www.metabolomicsworkbench.org/rest
8.5.3. Step 3: Describing a path
The Metabolomics API offers several examples, let’s tackle one of them:
Example request |
Example URL |
|---|---|
Show all publicly available studies (Project, Study, Analysis ID) |
https://www.metabolomicsworkbench.org/rest/study/study_id/ST/available |
This tells us what the endpoint does to an extent; let’s add that to our API under the paths.
paths:
  /study/study_id/ST/available:
    get:
      description: Fetch summary information for all studies
The path is relative to the server url, and get refers to the REST method (GET as opposed to POST, PUT, DELETE, …), in REST GET refers to reading a resource and is what happens when you send the following packet to a web server. These packets can be crafted using curl, the -v flag helps see input and output packets and the -X flag allows you to set the method (GET, POST, …), the -H flag lets you specify headers.
curl -v -X GET -H 'Content-Type: application/json' https://www.metabolomicsworkbench.org/rest/study/study_id/ST/available
...
> GET /rest/study/study_id/ST/available HTTP/1.1 # PATH HERE
> Host: www.metabolomicsworkbench.org            # REQUEST HEADERS HERE
> User-Agent: curl/7.70.0
> Accept: */*
> Content-Type: application/json
>
* Mark bundle as not supporting multiuse
< HTTP/1.1 200 OK                                # RESPONSE STATUS CODE HERE
< Date: Wed, 27 May 2020 14:29:27 GMT            # RESPONSE HEADERS HERE
< Server: Apache/2.4.6 (CentOS)
< X-Frame-Options: SAMEORIGIN
< Vary: Accept-Encoding
< X-XSS-Protection: 1; mode=block
< Transfer-Encoding: chunked
< Content-Type: application/json
<                                                # BODY HERE
{
  "1": {
    "project_id":"PR000001",
    "study_id":"ST000001",
    "analysis_id":"AN000001"
  },
  "2":{
    "project_id":"PR000002",
    "study_id":"ST000002",
    "analysis_id":"AN000002"
  },
  ...
  "1783":{
    "project_id":"PR000928",
    "study_id":"ST001364",
    "analysis_id":"AN002271"
  }
}
...
Note that your web browser does the same, albeit with a few different headers for end-to-end compression and browser information for webpage optimization.
> GET https://www.metabolomicsworkbench.org/rest/study/study_id/ST/available HTTP/1.1
> Host: www.metabolomicsworkbench.org
> Content-Type: text/html
> User-Agent: Mozilla/5.0 ...
> Accept-language: en-US,en;q=0.5
> Accept-Encoding: gzip, deflate
The GET at the start is changed to POST or another value when sending actual data (in the body of the packet). (curl -v -X POST ... -d "packet data")
We did not know what the response would be by the webpage, but OpenAPI provides a means to describe this as well.
paths:
  /study/study_id/ST/available:
    get:
      description: Fetch summary information for all studies
      responses:
        '200':
          description: Success
          content:
            application/json:
              schema:
                type: object
                additionalProperties:
                  type: object
                  properties:
                    project_id:
                      type: string
                    study_id:
                      type: string
                    analysis_id:
                      type: string
The 200 here refers to the HTTP status code, these are standardized by HTTP but the gist is:
Code |
Meaning |
|---|---|
2xx |
OK (created, no content, …) |
3xx |
Redirect (temporary, permanent, …) |
4xx |
Not OK (not found, permission denied, …) |
5xx |
Server Error |
We can explicitly describe what the response means for our application in the description under the response code. The content -> application/json refers to the Content-Type returned on the response header. This header tells you that the body will be json, and not i.e. text/html which we view most webpages as.
Finally, the schema is JSON-Schema describing how the JSON should look. It also supports describing each field individually in depth, and specifying optional or mandatory fields. We use additionalProperties to refer to the values in the object, and properties on a type: object to refer to the key specific description.
The benefit of fully describing and endpoint like this is that a developer can fully understand what to expect from an endpoint, enabling them to determine code logic validity prior to having to test it at runtime. Furthermore, the SmartAPI initiative has an extension for relating those types to RDF for visions like the BioThings.
8.5.4. Step 4: Adding a path with parameters
Let’s tackle our next endpoint:
Example request |
Example URL |
|---|---|
Fetch analysis information for a study |
https://www.metabolomicsworkbench.org/rest/study/study_id/ST000001/analysis |
While the example shows ST000001 in reality, the idea is that this can be any study ID, such as those coming out of the previous endpoint.
paths:
  ...
  /study/study_id/{study_id}/summary:
    get:
      description: Fetch summary information for a study
      parameters:
      - in: path
        name: study_id
        description: The unique study identifier
        schema:
          type: string
          pattern: '^ST\d*$'
        example: ST000001
        required: true
      responses:
        '200':
          description: Success
We see some new concepts here, the first is the path which has a variable in it delineated by {study_id} where we would want the study_id to go. Paired with this we add an entry into the parameters array and state the same name study_id is in: path referring to this path-style variable substitution.
Parameters can be added in other places as well. Google, for instance, describes searches like so: https://www.google.com/search?q=smartapi&sourceid=chrome&ie=UTF-8, the ?q=...&sourceid=... are referred to as query parameters and they are in the form: ?{name}={value}&{name}={value}&.... You could describe these in OpenAPI as well by using in: query.
In the case of a POST you might use, in: body referring to the content you send with your request.
Again, every parameter is validatable with JSONSchema. In our current example, we have used a JSONSchema pattern to constrain the type of string acceptable by the endpoint. In the case of a body, it could be an elaborate JSON object such as our response schema.
Finally, we have included an example which will help developers with rapid testing of endpoints given valid examples. Using this example, we can use our OpenAPI Editor to trigger a new request:
Fig. 8.9 fair-api-images/ss2s.
With the output, we can complete our path by annotating the response:
paths:
  ...
  /study/study_id/{study_id}/summary:
    get:
      ...
      responses:
        '200':
          description: Success
          content:
            application/json:
              schema:
                type: array
                items:
                  type: object
                  properties:
                    study_id:
                      type: string
                    study_title:
                      type: string
                    study_type:
                      type: string
                    institute:
                      type: string
                    department:
                      type: string
                    last_name:
                      type: string
                    first_name:
                      type: string
                    email:
                      type: string
                    submit_date:
                      type: string
                    study_summary:
                      type: string
                    subject_species:
                      type: string
8.5.5. Step 5: Identifying components
In some cases, a common set of JSON objects are reused throughout the API. It is often meaningful to turn these into their own ‘component’ and reference them. It is also extremely helpful to include descriptions especially for fields that are not directly interpretable.
paths:
  ...
  /study/study_id/{study_id}/summary:
    get:
      ...
      responses:
        '200':
          description: Success
          content:
            application/json:
              schema:
                $ref: '#/components/schemas/StudySummary'
  ...
components:
  schemas:
    StudySummary:
      description: Summary information about a study
      type: object
      properties:
        study_id:
          type: string
          description: A unique identifier for this study
        study_title:
          type: string
        study_type:
          type: string
          description: The type of treatment used in the study
        institute:
          type: string
          description: The institution that performed the study
        department:
          type: string
          description: The department in the institute that performed the study
        last_name:
          type: string
          description: The last name of the PI responsible for the study
        first_name:
          type: string
          description: The first name of the PI responsible for the study
        email:
          type: string
          description: The email to contact for information about the study
        submit_date:
          type: string
          description: The date this study was submitted to metabolomics workbench
        study_summary:
          type: string
          description: A detailed summary describing the study
        subject_species:
          type: string
          description: The species of the subject of the study
Under components, as many individual components can be specified, and they can be referenced using $ref with JSON-Schema pointers as shown above.
8.5.6. Step 6: SmartAPI extension
When it comes to automatic interoperability, the SmartAPI extension to OpenAPI is almost essential. It provides mechanisms for adding RDF annotations to parameters or responses. We will demonstrate it on a new endpoint:
Example request |
Example URL |
|---|---|
Fetch all protein fields from Entrez gene id |
https://www.metabolomicsworkbench.org/rest/protein/gene_id/19/all/ |
paths:
  /protein/gene_id/{gene_id}/all/:
    get:
      description: Fetch all protein fields from Entrez gene id
      parameters:
      - in: path
        name: gene_id
        description: The unique study identifier
        schema:
          type: string
        example: '19'
        required: true
      responses:
        '200':
          description: Success
          content:
            application/json:
              schema:
                type: object
                properties:
                  gene_id:
                    type: string
                    description: Entrez Gene ID
                  mgp_id:
                    type: string
                    description: MGP ID
                  gene_name:
                    type: string
                    description: Verbose gene name
                  gene_symbol:
                    type: string
                    description: Entrez Gene Symbol
                  taxid:
                    type: string
                    description: Taxonomy taxon ID
                  species:
                    type: string
                    description: Species name
                  species_long:
                    type: string
                    description: Species official name
                  mrna_id:
                    type: string
                    description: ID of the MRNA
                  refseq_id:
                    type: string
                    description: ID on refseq
                  protein_gi:
                    type: string
                    description: ID on GI
                  uniprot_id:
                    type: string
                    description: ID on GI
                  protein_entry:
                    type: string
                    description: Protein term
                  protein_name:
                    type: string
                    description: Verbose protein name
                  seqlength:
                    type: string
                    description: Length of the sequence
                  seq:
                    type: string
                    description: The protein sequence itself
          x-responseValueType:
          - x-path: gene_id
            x-valueType: https://identifiers.org/ncbigene
          - x-path: gene_symbol
            x-valueType: https://identifiers.org/genecards
          - x-path: tax_id
            x-valueType: https://identifiers.org/taxonomy
          - x-path: mrna_id
            x-valueType: https://www.ncbi.nlm.nih.gov/nuccore
          - x-path: refseq_id
            x-valueType: https://www.ncbi.nlm.nih.gov/protein
          - x-path: uniprot_id
            x-valueType: https://identifiers.org/uniprot
Here we see our usual path setup with a new section: x-responseValueType, this is the smartAPI extension.
Each x-path refers to the path in the JSON object (using . on nested keys).
For instance, the gene_id does not need any . because it is the root of the response object.
The x-valueType here identifies the id namespace or context for which that value has meaning.
Typically, this is a prefix path, in other words, you would produce a full URI with: {x-valueType}/{actual_value}.
identifiers.org is a public resource cataloging actual identifier schemes making it an ideal way to namespace a given identifier. It has the added benefit of providing an API for accessing additional metadata such as cached schema.org annotations on the landing page of the resulting identifier.
With the annotations fully described here, it becomes possible to eventually utilize your API for federated RDF queries without any additional effort. This was demonstrated by the BioThings, which can integrate SmartAPI APIs with proper annotations. It also permits end users to find your APIs knowing their identifiers (i.e. ncbigenes).
8.5.7. Step 7: Publishing and utilizing your OpenAPI/SmartAPI
Once you have a working OpenAPI document, this open up numerous possibilities that you can now do. Firstly, your API can be published on smart-api.info, permitting people and machines to locate it and potentially utilize it.
But you can also produce interactive documentation much like the output seen in the OpenAPI editor to publish on your webpage.
It is even possible to automatically generate statically or dynamically code in many different programming languages for API clients or Server stubs (i.e. for API first or compatibility) with the openapi-generator.
An initiative by IBM provides a mechanism for interoperating an OpenAPI documented endpoint with GraphQL.
These various capabilities make an API extremely accessible, lowering many barriers to entry for interoperability and reusability of your API.
8.6. Conclusion
We’ve walked you through a case study where we documented an API using OpenAPI and SmartAPI extensions to build a document that will vastly improve the FAIRness of your API. After registering your API on an API catalog platform, such as smart-api.info you will enable developers and programs to find, introspect and interoperate with our API. Furthermore, existing tooling around OpenAPI can enable the accessibility and reusability of your APIs in many programming languages and other standardized systems.
8.6.1. What to read next?
This content type focus on using OpenAPI.
Grlc: “converting your SPARQL queries into RESTful APIs”
GraphQL: “a Query Language for your API”
OpenAPI-to-GraphQL “From OpenAPI-to-GraphQL “
ISA-graphql “an example of a GraphQL querying mechanism built to interrogate ISA metadata”.
8.7. References
Reference
8.8. Authors
Authors
Name |
ORCID |
Affiliation |
Type |
ELIXIR Node |
Contribution |
|---|---|---|---|---|---|
Icahn School of Medicine at Mount Sinai |
Conceptualization, Writing - Original Draft |